
The most popular advice on how to make AI music video content starts with a prompt. That's backwards. A prompt gives you a pretty clip, not a releasable cut. It says nothing about whether you can use the song, whether the singer's face will survive the chorus, or whether a cut lands on the beat or near it.
Start with the work that makes a video publishable. Clear the track, map the beats, generate short shots you can reject, and assemble only what passes. Then disclose what you made and export versions built for where people will watch.
Table of Contents
- Clear the Song Before You Generate
- Choose the Audio and Model Before Generating
- Lock Every Hit to a Beat Map
- Keep One Face Across Every Shot
- Assemble the Cut From Approved Shots
- Caption Label and Export Each Version
- Publish the Disclosed Vertical Hook First
<a id="clear-the-song-before-you-generate"></a>
Clear the Song Before You Generate
A blank rights row means don't generate. That's the rule I set before any creative work. A model making the pictures doesn't make the finished video free to publish, because the song, the voice, the face, and your reference images each carry their own permissions. If one of them isn't cleared, a commercial release can be pulled, demonetized, or disputed after you've spent your credits.
The World Intellectual Property Organization overview of the US Copyright Office position reports that AI-generated creations are not eligible for copyright protection under US law, while sufficiently original human selection, arrangement, or modification may be protectable. Your edit decisions carry legal weight, not just creative weight. Keep a prompt log, save your iterations, and record what you selected, reordered, retimed, and added.
<a id="fill-the-ledger-before-you-open-a-generator"></a>
Fill the ledger before you open a generator
Rights ledger before generation
| Permission | Covers | Safe source | Record to keep |
|---|---|---|---|
| Composition | Melody and lyrics | Original or sync license | License or authorship note |
| Sound recording | Master, stems, samples | Owned stems or licensed master | File plus sample clearances |
| Voice and likeness | Singer voice and recognizable face | Consent; no living-artist clone | Written consent |
| Visual references | Photos, stock, style refs | Licensed or original assets | Prompt log and model terms |
Work the rows in order. The composition is the underlying melody and lyrics, even if you rerecord them yourself. You need a synchronization license for someone else's song, or proof that you wrote it. The sound recording is the actual audio file you'll cut to, including stems and any sample tucked inside it.
The sound recording row is where most projects fail. A beat leased for streaming audio doesn't automatically cover video, advertising, or client use, so read the permitted uses rather than assuming the purchase receipt is enough.
<a id="voice-face-and-visual-inputs-are-separate-permissions"></a>
Voice, face, and visual inputs are separate permissions
A singer can consent to recording a song without consenting to a cloned voice or a synthetic performance of their face. Get written consent that names the AI use, the platforms, and whether the result can be used in paid promotion. Don't prompt for a living artist's distinctive voice or visual identity and call it a tribute. If a viewer can recognize the person, treat it as a likeness problem, not a style choice.
Your visual inputs need the same discipline. Save licenses for reference photos, stock, and location images, and save the model terms that allow commercial use on the date you generate. Screenshots from another video, artwork you found online, and a celebrity photo used as a character reference don't become safe because the output looks different.
Go or no-go rule: If you can't name the owner, the permission, and the file that proves it, the asset doesn't enter the project.
Store the finished ledger next to the project file and date it. When a platform or client asks who owns what, you answer from one document instead of a memory search. Only then does generation stop being a legal gamble.
<a id="choose-the-audio-and-model-before-generating"></a>
Choose the Audio and Model Before Generating
Pick your audio route and your generation models in one pass, before you make a single shot. Changing the track later breaks your timing. Changing models mid-project breaks your character, your color, and often your commercial terms.
<a id="pick-one-audio-route"></a>
Pick one audio route
- Licensed commercial track: Use it only when the synchronization rights cover video and the platforms you plan to publish on.
- Original song: Keep your session files, stems, and writing credits together so authorship is easy to prove.
- AI-created track: Check that the service terms allow commercial release, not just personal listening or social posting.
Export the stems you need, usually the full mix and vocal. Confirm the BPM by tapping or analyzing the file, and write down the timecode of the first downbeat. Don't trust the number in a filename. A wrong tempo at this stage will poison every cut you make later.
<a id="choose-a-model-per-shot-type-not-one-model-for-everything"></a>
Choose a model per shot type, not one model for everything
Use text-to-video for establishing wide shots where there's no recurring person to protect. Use image-to-video for the performer, starting from a cleared reference frame you can reuse. For a product, instrument, or location that returns, lock a fixed reference image and repeat it. If you're testing a broader toolset, an AI movie maker workflow can help you compare how different generators handle scenes before you commit credits.
Run the same written shot through two or three candidate models. Judge the results on three things only: does the identity hold, is the motion smooth, and did the model follow the camera move you specified? Ignore which clip looks most spectacular in isolation. You're casting a tool for a repeatable job.
Check each model's commercial-use terms and maximum clip length before buying a large credit pack. Save the model name, version, settings, and date in your prompt log. Your checklist is finished when the track source is named, stems are exported, BPM is confirmed, model terms are saved, and one test clip per shot type has passed review.
<a id="lock-every-hit-to-a-beat-map"></a>
Lock Every Hit to a Beat Map
Aim for about 100 milliseconds. That's your practical tolerance for whether a visual event feels locked to the music or merely close. According to ACM research on audio-video alignment, a scene-change measure treats a visual change as aligned when it occurs within 0.1 seconds of a musical beat, and alignment methods accept matches within a three-frame window, which at 30 fps is approximately 100 ms. Don't ask a generator to feel the groove for you. Build the map yourself, then make the pictures obey it.
<a id="analyze-first-assign-second"></a>
Analyze first, assign second
Load the cleared mix into your editor or a beat-tracking tool and mark tempo, downbeats, onsets, section boundaries, and high-energy moments. Onsets are the attacks, the drum hits, vocal entries, and sudden musical stabs that viewers feel as events. Downbeats are where the bar turns over. Together they form the skeleton of your edit.
Then assign visual events to chosen beats. A shot change, a camera direction change, a flash frame, or a lyric pop can all serve as a hit, but they don't all deserve the same musical moment. Reserve the strongest events for downbeats, chorus entries, and clusters of onsets. Let verses breathe with longer holds. If you're developing concepts for each section, written music video ideas work better after this map exists, because you'll know how long each idea has to survive on screen.
Cutting on every beat doesn't create energy. It creates noise, and the story disappears underneath it.
Say your chorus hits harder than the verse. Don't double the cutting rate everywhere. Keep a verse shot running across several bars so the viewer learns the performer and location. At the chorus downbeat, change location, scale, or camera direction. Smaller accents can land on selected onsets inside the shot. That contrast reads as musical because the picture changes when the arrangement changes.
<a id="validate-the-map-like-an-editor-not-a-fan"></a>
Validate the map like an editor, not a fan
Use a Beats Hit Score as a sanity check: count your aligned visual events and divide by the reference beats you intended to hit. You don't need a perfect score, because you shouldn't hit every beat. You need the events you promised to land inside your tolerance window. Spot-check by muting the picture's motion peaks against the waveform. If a head turn, light flash, or cut sits visibly after the drum transient, move it.
Three failures account for most drift:
- Wrong BPM estimate: Every later marker slides further from the actual beat as the song progresses.
- Half-time or double-time confusion: The cuts feel rushed or sluggish even though individual hits look close.
- Drift after trims: Variable-length shots and frame-rate conversions subtly move events away from their targets.
Recalculate after every retime, trim, or frame-rate change. The beat map isn't a planning document you file away. It's the timing reference for the whole production, and it has to match the file you're exporting.
<a id="keep-one-face-across-every-shot"></a>
Keep One Face Across Every Shot
Write a shot specification before you generate anything. One long generation hides its failures until you've paid for them. Short, specified shots can be judged, rejected, and replaced without remaking the video.
A useful shot plan can start as a simple board that the whole team reads the same way.
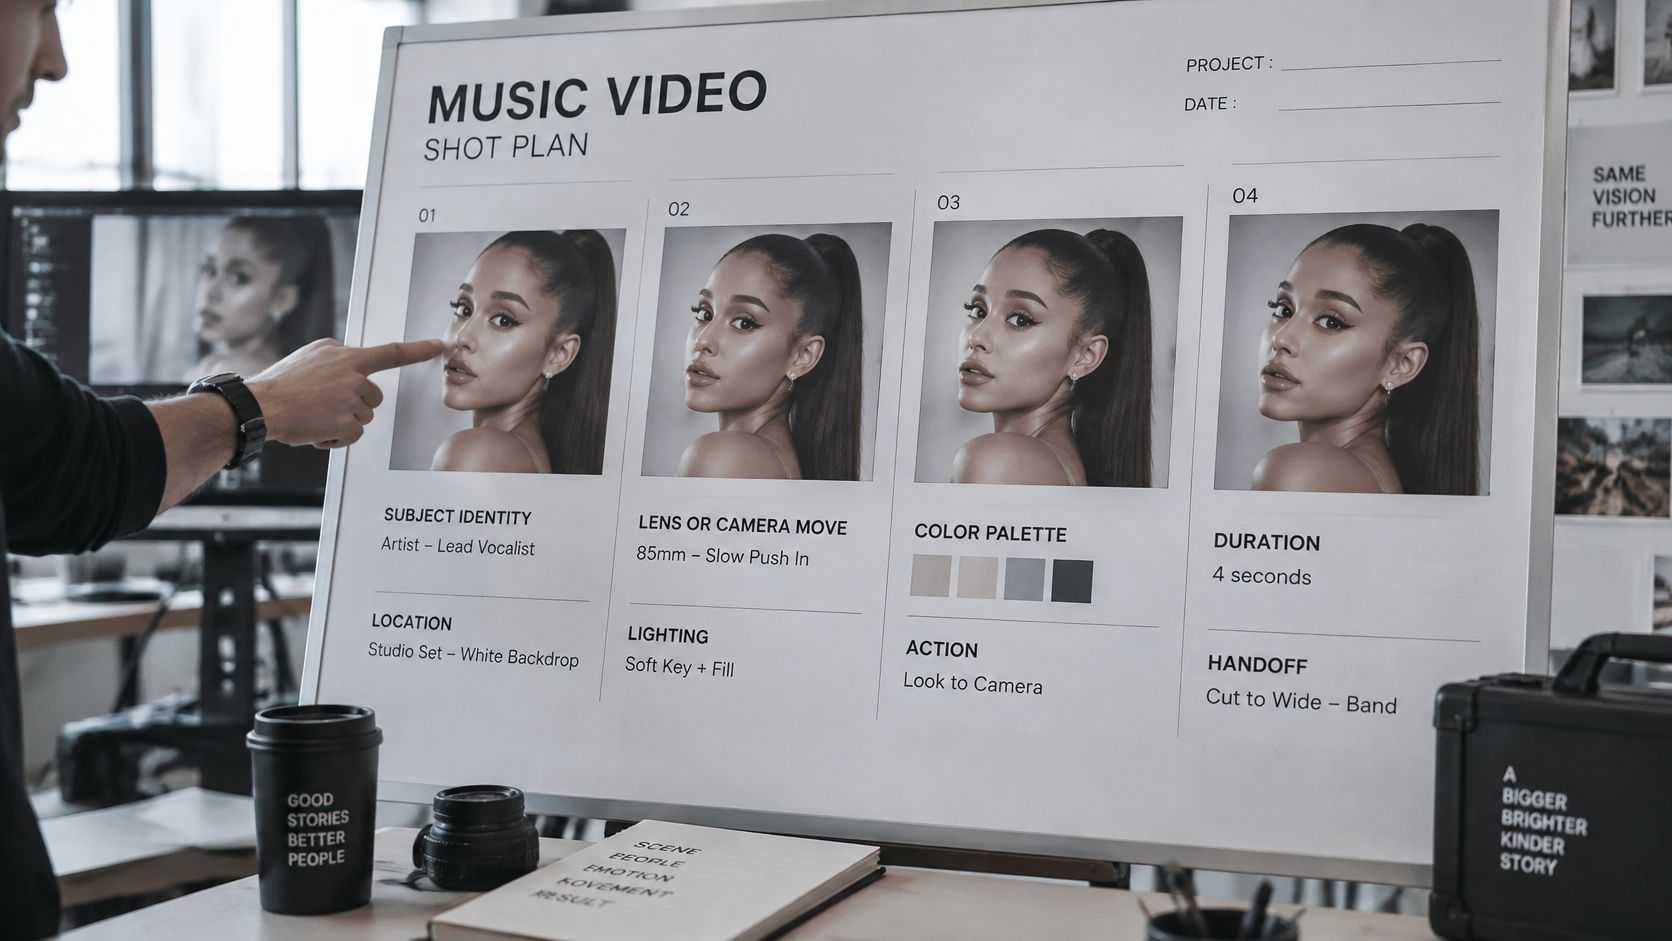
Each specification should name the subject identity, location, lens or camera movement, lighting, color palette, action, duration, and transition intent. Generate several candidates from that same specification and keep the most stable take. Don't rewrite the prompt in a new order for every shot. Consistent structure gives the model fewer chances to reinterpret the performer, wardrobe, or room.
<a id="know-what-to-reject"></a>
Know what to reject
Inspect candidates frame by frame at delivery resolution, not as thumbnails in a generation queue. Reject clips with flicker, a changing face or outfit, warped hands or instruments, unstable backgrounds, broken geometry, or discontinuous motion. The AIGCBench evaluation framework separates generated video into control-video alignment, motion effects, temporal consistency, and video quality, and uses adjacent-frame CLIP similarity as one temporal-consistency signal. You don't need that lab setup at home, but the categories tell you what to look for: did it follow your instruction, does it move plausibly, does it stay itself from frame to frame, and is the image clean enough to publish?
This breakdown shows how small continuity errors become obvious once shots are placed back to back.
<iframe width="100%" style="aspect-ratio: 16 / 9;" src="https://www.youtube.com/embed/U2kmM6heJAw" frameborder="0" allow="autoplay; encrypted-media" allowfullscreen></iframe>When the same performer or product returns, prefer image-to-video or reference-conditioned generation over fresh text prompts. Reuse the fixed reference and seed where the tool supports it. Keep camera motion conservative. Slow pushes, locked-off shots with subject movement, and simple pans survive generation better than fast zooms, whip moves, or crowded interactions between several people.
Render a low-resolution editorial preview before you spend money on final quality. Watch it against the beat map for rhythm and continuity. Only then generate the 1080p or 4K masters for shots that already pass.
Reject rule: If the face changes between the verse and the chorus, regenerate that shot. Don't hide an identity failure with a faster cut.
<a id="assemble-the-cut-from-approved-shots"></a>
Assemble the Cut From Approved Shots
Assembly is where a streaming-first audience should shape your decisions. The WIPO Magazine summary of IFPI industry data reports that the global recorded-music industry generated US$29.6 billion in 2024 and streaming accounted for 69% of that revenue. The same summary reports more than 750 million paid music-streaming subscription accounts worldwide and over 100,000 new recordings uploaded every day. Your opening seconds are competing in that flood, so build the cut for retention rather than treating the timeline as a storage bin for good generations.
<a id="build-the-timeline-in-order"></a>
Build the timeline in order
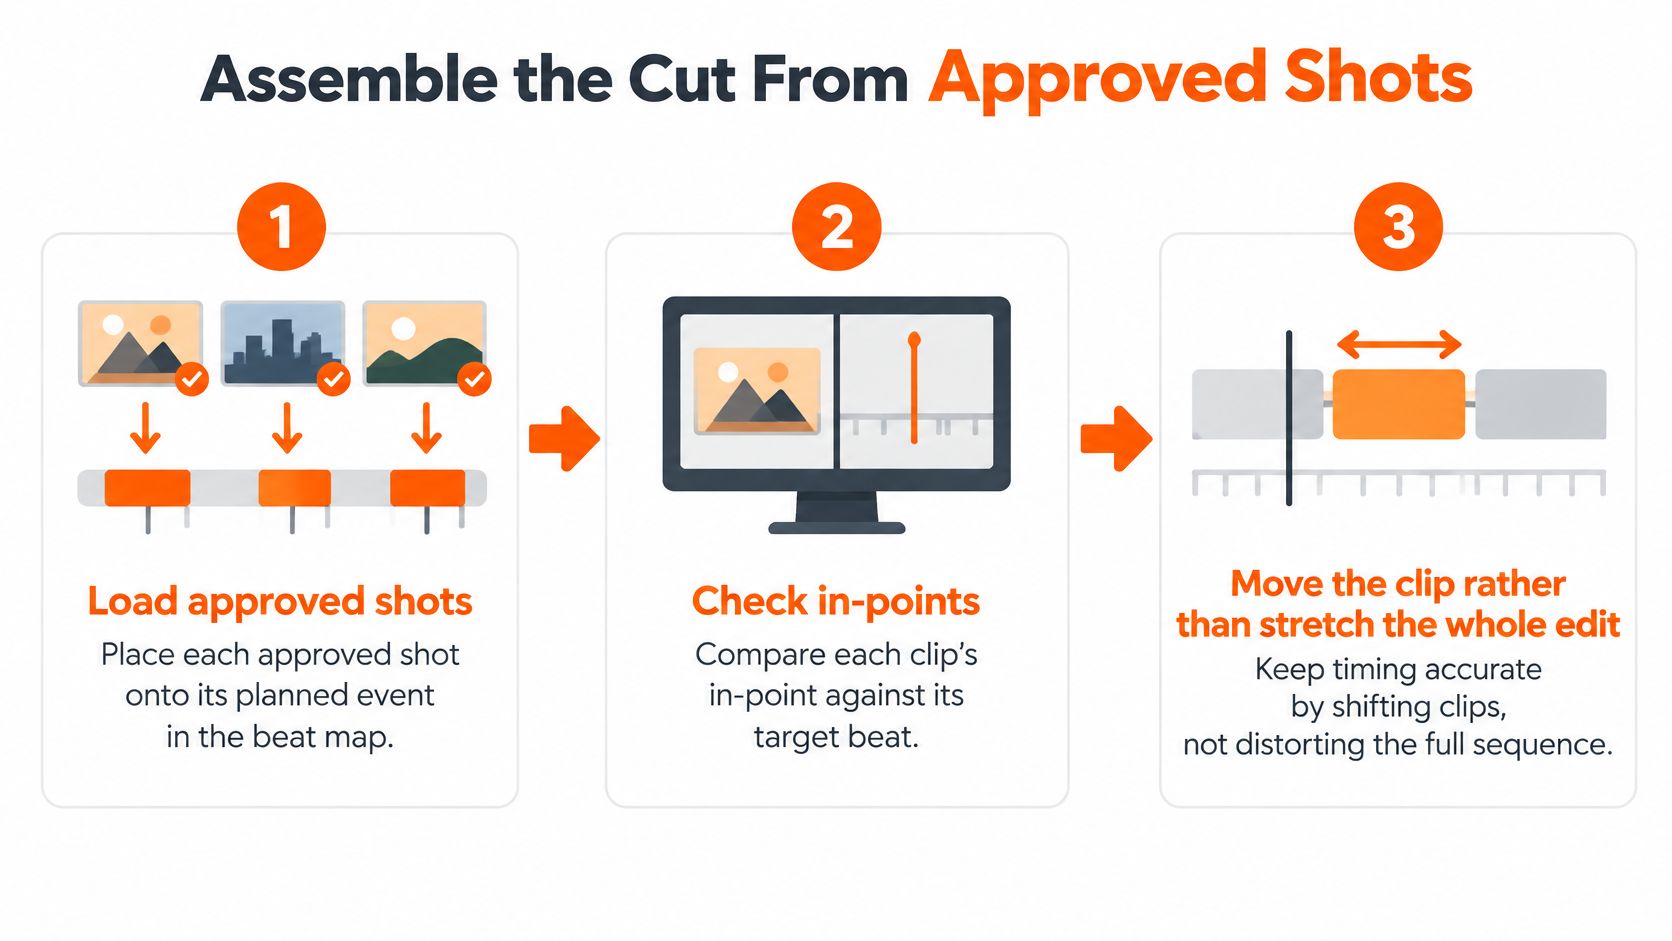
- Load approved shots: Place each shot from the low-resolution preview onto its planned event in the beat map.
- Check in-points: Compare each clip's starting frame and motion peak against its target beat.
- Move the clip, not the map: Shift the shot when its strongest motion already belongs on the event.
- Lay sections in order: Build intro, verse, chorus, bridge, and outro, giving the chorus the most visual change and the verse the longest holds.
- Add lyric captions selectively: Caption vocal phrases viewers should read, timed to the vocal line rather than pasted onto every cut.
- Trim and recheck: After every trim, confirm the next hit hasn't drifted from its beat.
- Watch the full assembly: Look specifically for late hits, identity jumps, and geometry breaks at cut points.
This order matters because one assembled timeline exposes problems that isolated clips conceal. A shot can look stable alone and still fail when the previous shot ends on a different eyeline, wardrobe detail, or background shape. Catch that now, while replacement is cheap.
Then cut a second opening from the same timeline. Start on the chorus or the clearest vocal hook for the first three seconds, then return to the song's normal structure if the edit allows it. Don't make the hook by speeding up the verse until it feels frantic. Use the strongest approved material you already have.
Your assembly is done when every section has an approved shot, the first three seconds carry a hook, and no uncleared asset remains anywhere in the timeline.
<a id="caption-label-and-export-each-version"></a>
Caption Label and Export Each Version
Don't dump captions, disclosure, and export settings into one final render. They're three separate layers with different jobs. Lyric captions help viewers follow the song. Disclosure tells them what was generated. Export settings make sure each platform receives a file framed for its player.
<a id="put-disclosure-where-viewers-and-platforms-can-find-it"></a>
Put disclosure where viewers and platforms can find it
Reuters reported on an Ipsos survey of 9,000 adults across eight countries in which 97% could not distinguish fully AI-generated music from human-made music, while 80% wanted fully AI-generated music clearly labeled and 73% wanted disclosure when platforms recommend it. That's not a reason to hide behind vague credits. It's a reason to make transparency part of the release.
State plainly whether the track, the pictures, or both are synthetic. Put the note in the video description, an on-screen card, the credits, distributor metadata, and the social caption. Distinguish AI-assisted editing from a fully synthetic performance. If a real singer recorded the vocal and AI only built the backgrounds, say that. If the voice itself is generated, don't bury that fact under production credits.
Keep a human performance, documentary detail, or recognizable imperfection when the artist's identity needs to stay legible. A flawless synthetic performer can make an independent musician look interchangeable. Sometimes the most credible choice is a real close-up in the verse and generated spectacle only where the arrangement opens up.
For readable on-screen lyrics, a dedicated caption generator for video can help you keep timing and placement consistent across versions. Place captions inside safe margins, keep them off faces and beat flashes, and don't caption every ad-lib if it turns the frame into a teleprompter.
<a id="export-one-cut-several-honest-versions"></a>
Export one cut, several honest versions
Export settings by destination
| Destination | Aspect | Frame size | Notes |
|---|---|---|---|
| Short-form hook | 9:16 | 1080 x 1920 | Chorus open, lyrics in safe margins |
| Feed post | 1:1 | 1080 x 1080 | Same cut, subject centered |
| Full music video | 16:9 | 1920 x 1080 | 30 fps so beat hits stay near 100 ms |
Reframe each version deliberately rather than center-cropping and hoping. Check that the performer's face, captions, and disclosure card survive the vertical crop. For other territories, reuse the same picture cut with translated captions and metadata instead of generating a new video from scratch.
Finally, compare a disclosed AI-enhanced cut with a conventional cut where you have both. Watch completion rate, saves, comments, shares, and negative feedback by platform. You're not testing whether viewers can detect AI. You're testing whether honest labeling and a legible human contribution earn more trust.
<a id="publish-the-disclosed-vertical-hook-first"></a>
Publish the Disclosed Vertical Hook First
Publish the vertical hook first when four conditions are met: the song is cleared, the face holds from verse to chorus, the first three seconds carry the chorus, and the caption states what was generated. If the vertical version is late, unlabeled, or built from an unresolved rights row, hold the widescreen master too. A bigger frame doesn't fix a release problem.
Watch the whole exported file before posting. AI can still miss a name, lyric, or visual detail, and a weak scene should be redone rather than hidden with a cut. Export the 9:16 hook, put the AI note at the start of the caption, then upload the 1:1 and 16:9 versions with the same disclosure.
If you want one workspace for that final pass, ClipNova's AI Video Studio lets you choose 9:16, 16:9, or 1:1, set a length from 30 seconds to 5 minutes, add your cleared track, and generate visuals, voiceover, and captions in 1080p. Treat it as one option among your tools, not a requirement. One customer put the appeal plainly: "I made my first music video in 9 minutes. It hit 220k views the next morning."
Keep the action small. Clear one track, map the chorus, export the vertical hook, and label it before it goes up.
Clear one track, build its beat map, and turn the chorus into a disclosed vertical hook before you make the full-length version. ClipNova gives you one studio for generating the visuals, captions, and multi-format exports around your cleared audio, so you can publish the hook and widescreen cut from the same project.
Ready to ship your own?
Start creating viral videos with AI in under twenty minutes, no credit card required.