
You've written the script, picked the footage, and opened the editor. Then the narration comes in flat, the first visual change feels late, captions cover the product, and the final export sounds quieter than everything else in the feed. That isn't four separate problems. It's one broken production chain.
A strong voice-over video moves through a single pipeline: script, voice, sync, captions, export, and localization. Each stage gives the next stage something usable. If the script has no breathing room, the voice actor has to fight it. If the voice timing is wrong, the edit becomes a series of awkward compromises. If captions and audio aren't designed together, viewers miss the point whether sound is on or off.
The workflow has deep roots. Reginald Fessenden's 1900 transmission is widely cited as the first spoken voice broadcast, while his Christmas Eve 1906 program is often treated as the first full-length radio show featuring music and voice. Later, Max Fleischer's 1926 cartoon My Old Kentucky Home became one of the early animation voice-over milestones, followed by Disney's 1928 Steamboat Willie, a defining early voice-synced audio event for video and animation. The production pattern was already familiar: script first, recorded narration next, then visuals synchronized to timing. (Voice-over origins and historical milestones)
Table of Contents
- Why the Voice Track Decides Everything
- Writing a Script That Sounds Spoken Out Loud
- Choosing Between Human and AI Voiceover
- Syncing Narration With Visuals Without Fighting the Edit
- Adding Captions That Match Your Voice Style
- Export Settings That Keep Quality and Reach
- Turning One Video Into a Multilingual Series
<a id="why-the-voice-track-decides-everything"></a>
Why the Voice Track Decides Everything
The footage can be beautiful and the captions can be perfectly styled, but viewers still need a reason to keep listening. The voice track supplies that reason through pace, emphasis, pauses, and point of view. It tells the audience what matters before the next cut arrives.
The common failure happens after the script looks finished. A creator records every sentence at the same volume, with the same rhythm, and leaves every pause intact. The result sounds like someone reading a document, not someone trying to make a useful point. Strong visuals can't rescue a narration track that gives viewers no vocal signal for the hook, the reveal, or the payoff.
Practical rule: Edit the voice before you edit the visuals. The narration is the spine, not background decoration.
Pacing matters more than raw word count. A shorter, energized read usually gives the editor more usable cut points than a slower take that technically contains every word. If a sentence sounds long, trim the sentence first. Stretching a clip to accommodate weak timing creates a visible problem that began in the script.
<a id="record-for-clarity-before-polish"></a>
Record for clarity before polish
Start in the quietest practical space you have. Turn off fans, move away from reflective walls, and record a short test before committing to the full take. Listen through headphones, because a hum or room echo that disappears on laptop speakers can become obvious in the final mix.
A phone can work when the setup is controlled. Use a close, stable microphone position, avoid handling noise, and keep your mouth at a consistent distance. If you're recording regularly, this guide on how to get pro audio from your phone is useful for improving capture quality before you open the editor.
<a id="give-every-line-a-job"></a>
Give every line a job
A short-form voice track should make the hook clear, carry one central idea, and finish with a next step. It shouldn't explain three unrelated benefits because the footage exists. When the voice works, the cuts, captions, and music support the message. They don't have to rescue it.
<a id="writing-a-script-that-sounds-spoken-out-loud"></a>
Writing a Script That Sounds Spoken Out Loud
Write for the mouth, not the page. A sentence that looks polished in a document can become awkward when it contains stacked clauses, repeated consonants, or no natural place to breathe.
For short-form work, build the script around three beats:
- Hook: Open with a question or bold claim that mirrors the viewer's problem. Keep it compact, ideally under 8 words. “Your captions are hiding the product” is stronger than “Today, we're going to discuss some common captioning mistakes.”
- Payoff: Deliver one idea and show why it matters. Don't use the middle of the video to introduce a second argument that needs its own setup.
- CTA: Tell the viewer what to do next, whether that's saving the video, trying a workflow, or visiting a product page.
Keep most sentences between 8 and 12 words. That range gives the speaker room to breathe and gives the editor clean opportunities to place a cut. Conversational delivery commonly sits around 130 to 160 words per minute, so use that as a starting point, then adjust for subject complexity and the speaker's natural rhythm.
<a id="build-around-audible-beats"></a>
Build around audible beats
Write the line that lands on the visual change, then mark the intended moment beside it. In ClipNova's script editor, you can draft the narration, tag each beat with a timestamp, and use those tags as visual cue points later.

Read the script aloud once before recording. Your mouth will find problems your eyes skip. Rewrite tongue-twisters, split clauses that require a rushed breath, and replace formal phrases with language you'd say to a customer.
A useful edit test is simple: remove any line that doesn't move the argument forward or set up the next cut. If deleting it changes nothing, it doesn't belong in a short video.
<a id="leave-room-for-performance"></a>
Leave room for performance
Don't over-punctuate the script with artificial pauses. Mark only the pauses that create meaning, such as a beat before the reveal or a breath after the hook. The performer should sound engaged, not trapped inside a punctuation exercise.
Record alternate reads for the hook and CTA. A calm version, a more urgent version, and a warmer version can change the entire edit without requiring new footage. You're not trying to create endless variations. You're giving yourself options at the moments that most affect the viewer's decision to continue.
<a id="choosing-between-human-and-ai-voiceover"></a>
Choosing Between Human and AI Voiceover
Human and AI narration solve different production problems. A human performer brings authenticity, emotional range, and spontaneous emphasis, especially when the script depends on vulnerability, humor, or trust. An AI voice brings speed, repeatability, and easier adaptation when the same message needs multiple versions.
The right choice depends on the job, not on a blanket belief that one approach has replaced the other. Industry trend reporting continues to emphasize the human voice's role in authenticity while also describing growing interest in AI narration, localization, and diverse voice talent. (2025 voice and audio industry trend findings)
| Scenario | Human Voiceover | AI Voiceover |
|---|---|---|
| Brand-defining launch | Strong emotional interpretation and recognizable identity | Useful for drafts, alternates, or supporting versions |
| High-volume testing | Slower to schedule and revise | Fast hook variations and consistent delivery |
| Multilingual adaptation | Excellent when a native performer reviews cultural nuance | Efficient for first-pass localization and repeatable updates |
| Sensitive or personal subject | Better control of empathy and restraint | Can sound too polished or emotionally disconnected |
| Branded series | Builds a familiar on-air presence | Maintains consistent tone across frequent episodes |
AI is practical when you need scale, multilingual variants, or repeated A/B reads of the same opening. It becomes risky when the content depends on lived experience, improvisation, subtle irony, or a host whose personality is part of the product.
Human delivery remains the safer choice for sensitive topics and hero creative. An experienced performer can slow down before a difficult idea, change emphasis after hearing the edit, and make a line feel intentional rather than merely pronounced.
The hybrid default: Use synthetic narration for routine volume and exploratory versions, then reserve human performance for moments where trust and identity carry the sale.
For a deeper comparison of workflows and capabilities, see AI voiceover tools for video creation. Whichever system you choose, listen for mispronounced names, unnatural breaths, sudden pitch changes, and emotional mismatches between the words and the visuals. A technically clean voice can still be wrong for the scene.
<a id="syncing-narration-with-visuals-without-fighting-the-edit"></a>
Syncing Narration With Visuals Without Fighting the Edit
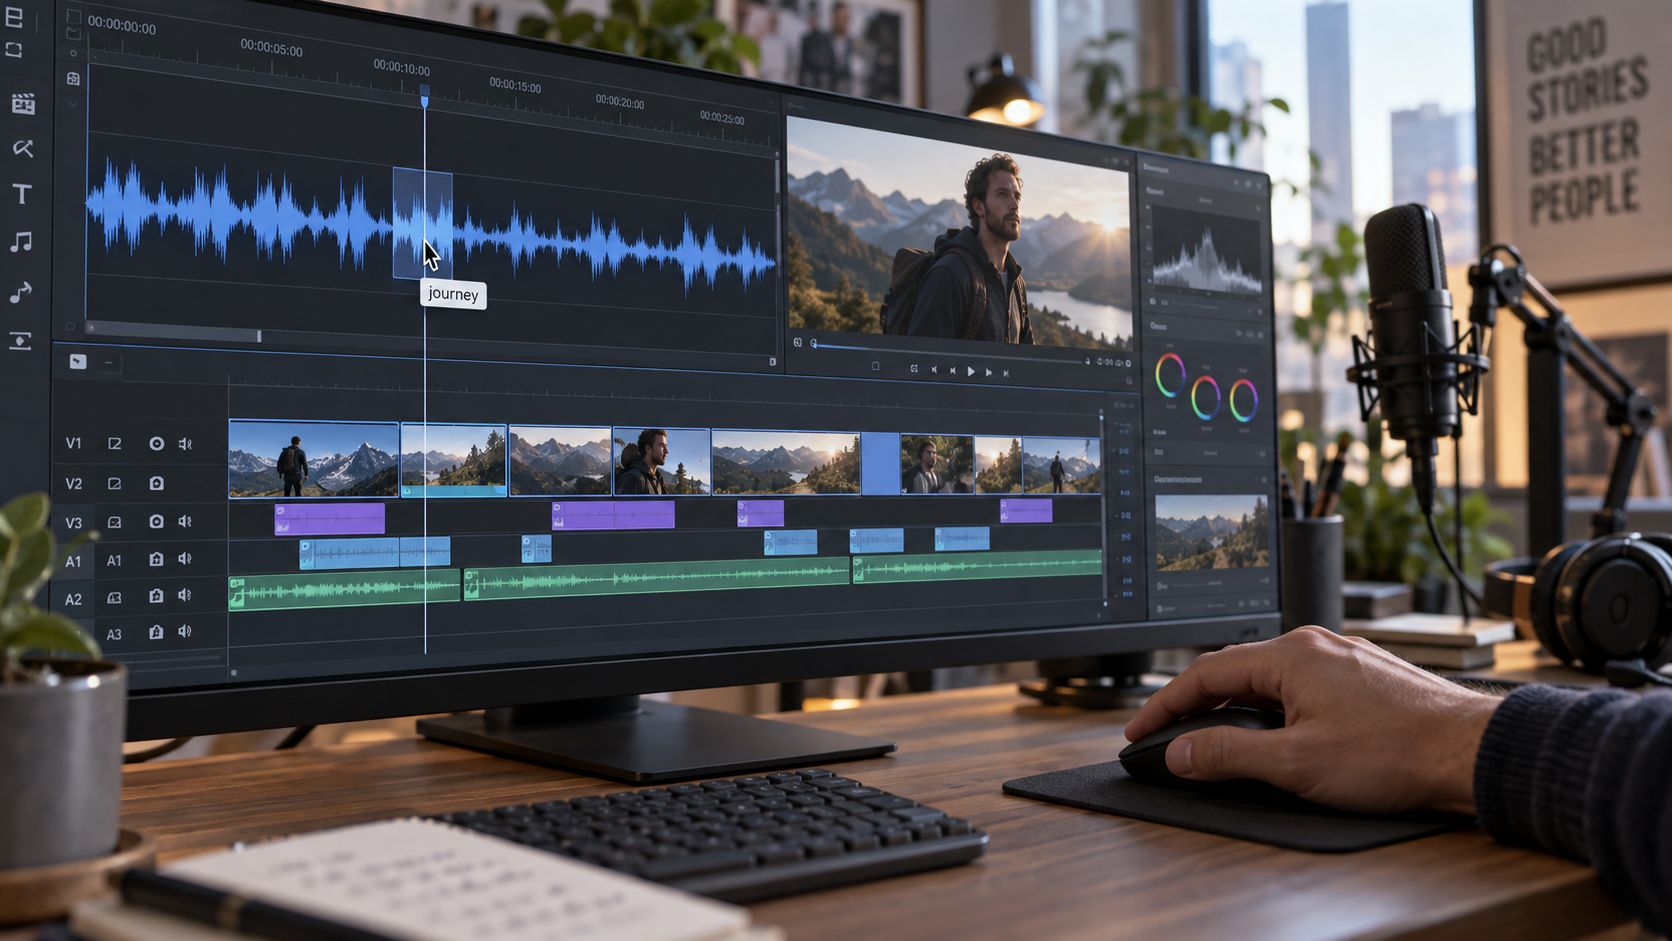
Put the voice track on the primary audio lane first. Place footage beneath it on V1, then zoom the timeline until you can see word boundaries rather than judging alignment from whole clip edges.
The first pass should identify the major beats: the question, the reveal, the proof, and the CTA. Mark each tonal shift. Don't place a cut merely because a clip has reached its nominal end. Place it where the spoken idea turns.
<a id="cut-from-the-sound"></a>
Cut from the sound
A reliable habit is to cut on the last syllable of the previous sentence, then let the new visual reinforce the next thought. This makes the transition feel motivated by meaning instead of imposed by the timeline.
If a phrase runs long over the planned shot, tighten the copy before stretching the footage. When the visuals are silent, a short room-tone pad can preserve continuity better than an obvious digital gap. Keep music and effects beneath the dialogue, not competing with it.
For sound effects, start around −18 to −24 dB beneath the voice and adjust by ear in context. Those effects should underline a transition or reveal. If viewers notice the effect before they understand the sentence, it's too prominent.
<a id="review-the-finished-assembly"></a>
Review the finished assembly
Preview the sequence at 0.5x speed to inspect lip movement, breath pauses, and visual punctuation. Then watch it at normal speed without stopping. Slow review finds technical offsets. Full-speed review tells you whether the piece feels natural.
A dedicated final sync pass matters because audio-visual alignment is difficult to evaluate reliably by eye alone. Recent benchmarking work evaluated alignment across 3,269 videos and 38,390 samples, while another benchmark included 78,722 segment annotations, and even top systems were not perfectly accurate. (Audio-visual alignment benchmark)
That research supports a practical editing rule: check the final assembly after export, not just the timeline preview. Small lip-sync errors, discontinuous segments, and misplaced cut points become especially visible in short-form clips.
For workflows that reduce repetitive timeline work, automated video editing workflows can help with assembly, but automation still needs a human quality pass. Let software create the first structure. Don't let it make the final timing decision without review.
<a id="adding-captions-that-match-your-voice-style"></a>
Adding Captions That Match Your Voice Style
Captions aren't a transcript glued onto the video after editing. They are a second delivery layer, especially for viewers who encounter the clip with sound muted. Plain text can communicate the words, but styled captions can reinforce rhythm, emphasis, and the hierarchy of the message.
Choose the caption treatment based on the voice performance:
- Word-by-word highlighting: Works well for punchy hooks and fast, emphatic reads.
- Line-by-line captions: Gives explainers and tutorials a calmer reading rhythm.
- Keyword emphasis: Draws attention to the commercial point without coloring every word.
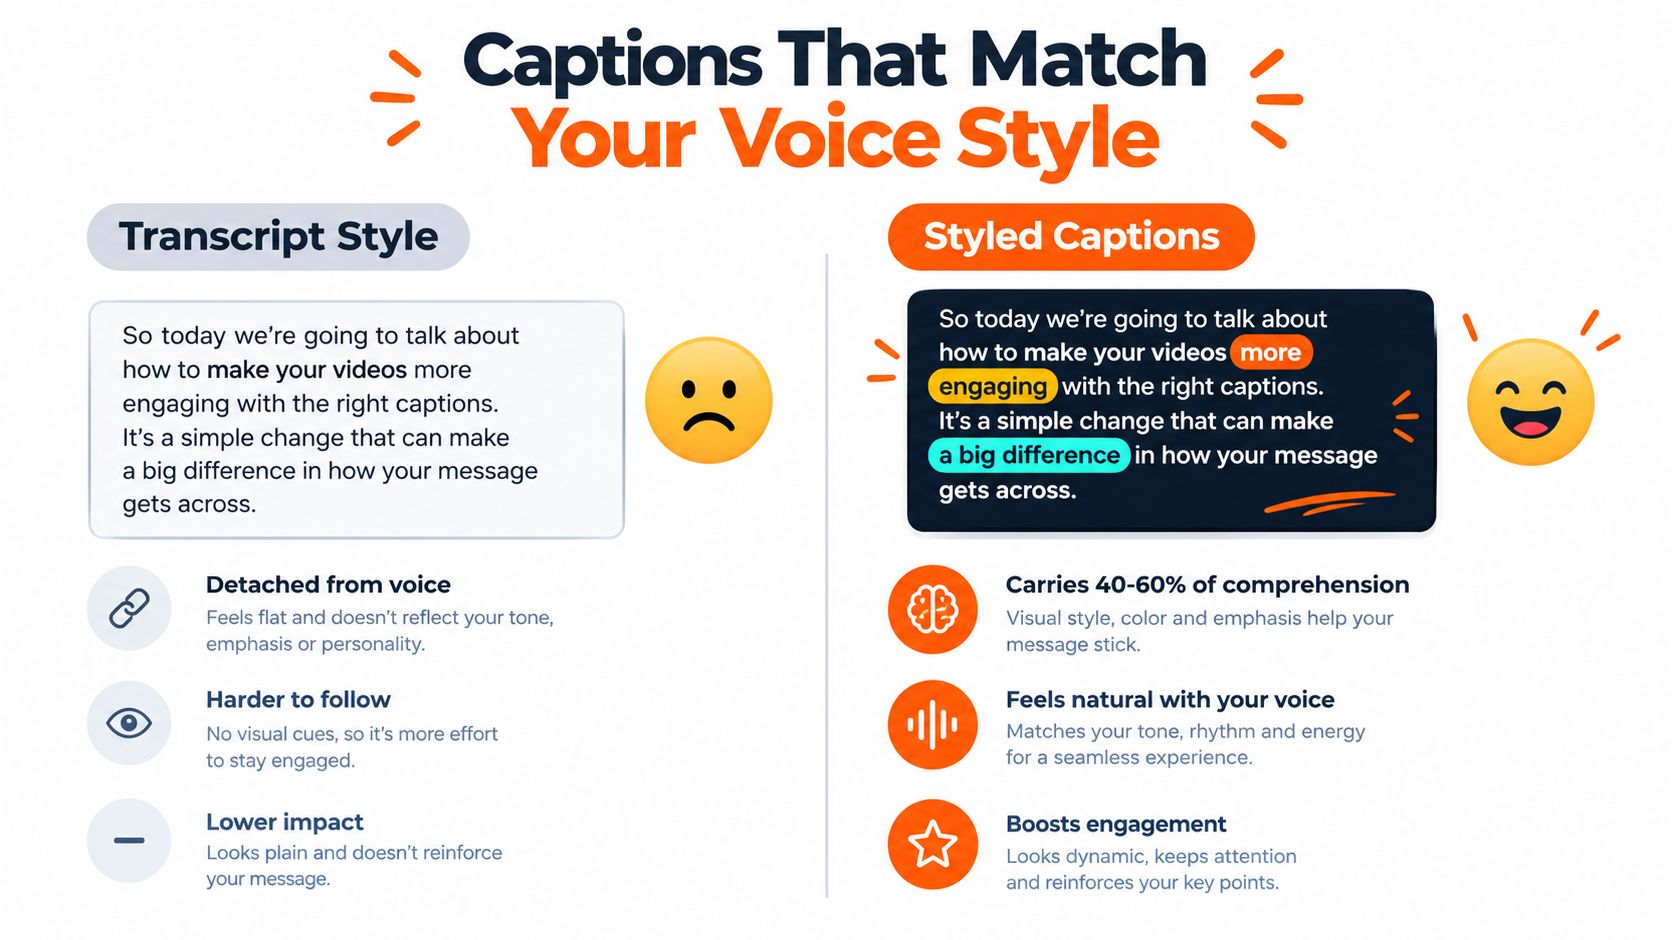
Keep caption blocks short enough to scan. A practical starting point is 6 to 8 words per line, with no more than two lines visible at once. Time the caption slightly after the spoken word so the viewer can hear the phrase and then confirm it visually, rather than forcing the eye to process a block before the voice arrives.
<a id="protect-the-mobile-frame"></a>
Protect the mobile frame
For a 1080 by 1920 vertical frame, keep captions inside a conservative safe area, approximately 200 pixels from the bottom and 100 pixels from the sides. Platform controls and account labels occupy changing parts of the interface, so a caption that looks safe in the editor can be covered in the feed.
Use strong contrast between text and background. A 4.5 to 1 contrast ratio is a useful accessibility threshold for normal text, and brand color shouldn't override legibility. Add a background plate, shadow, or outline when the footage changes behind the words.
<a id="render-captions-into-the-master"></a>
Render captions into the master
Export an editable caption file when another editor may need to revise the video, then create a version with captions visibly rendered into the picture for direct posting. Platform handling of separate subtitle tracks varies, and an overlay that works in one destination may not survive another.
The guide to adding subtitles to a video covers the mechanics, but the creative decision remains yours. Captions should sound like the speaker. Don't correct every conversational fragment into formal copy if the performance relies on natural speech.
<a id="export-settings-that-keep-quality-and-reach"></a>
Export Settings That Keep Quality and Reach
The final render can undo careful production. A clean voice track may become harsh after compression, captions may shift outside the safe area, and a platform preset may produce a file that looks soft on a modern phone.
For most vertical short-form exports, use a consistent baseline: 1080 by 1920, H.264, 30 fps, and a bitrate around 8 to 12 Mbps. Choose 4K when the destination and source justify it, such as a YouTube main-feed upload or a portfolio master. For everyday vertical distribution, a well-encoded 1080p file is usually the more practical delivery file.
| Platform | Resolution | Codec | Bitrate | FPS |
|---|---|---|---|---|
| Reels | 1080 × 1920 | H.264 | 8 to 12 Mbps | 30 |
| Shorts | 1080 × 1920 | H.264 | 8 to 12 Mbps | 30 |
| TikTok | 1080 × 1920 | H.264 | 8 to 12 Mbps | 30 |
| YouTube main feed | 1080p or 4K | H.264 | Match the selected master | 30 |
<a id="master-loudness-not-just-peaks"></a>
Master loudness, not just peaks
Normalize the final mix after editing, rather than normalizing each voice clip early. Online and on-demand delivery workflows commonly center on −23 LUFS, with a true-peak ceiling, and AES guidance aligns with EBU R128 and related recommendations around −23 to −24 LUFS. (AES loudness resources and references)
Peak level alone doesn't tell you how loud the finished voice feels beside music and effects. A clip can avoid clipping and still sound weak because its average loudness is low. Make the voice clear in the mix, then normalize the completed program once.
Keep the editable SRT alongside the project for revisions, and render a baked-caption master for posting. Before scheduling, play the export on a phone over a cellular connection. If playback struggles, revisit the bitrate rather than assuming the viewer's device will compensate.
<a id="turning-one-video-into-a-multilingual-series"></a>
Turning One Video Into a Multilingual Series
One language is a production choice, not a distribution strategy. Voice buyers increasingly need multilingual work for branding and marketing, and 52% anticipate voice work in those areas. Meanwhile, 58% of surveyed buyers have worked with or plan to work with non-English voice artists. (State of the voice-over industry in 2025)
The mistake is treating localization as a translation task after the edit is locked. Translated sentences change length, emphasis, and sometimes the order in which information makes sense. The localized voice must be timed against the localized script, captions, overlays, and visual beats.
<a id="a-repeatable-localization-pipeline"></a>
A repeatable localization pipeline
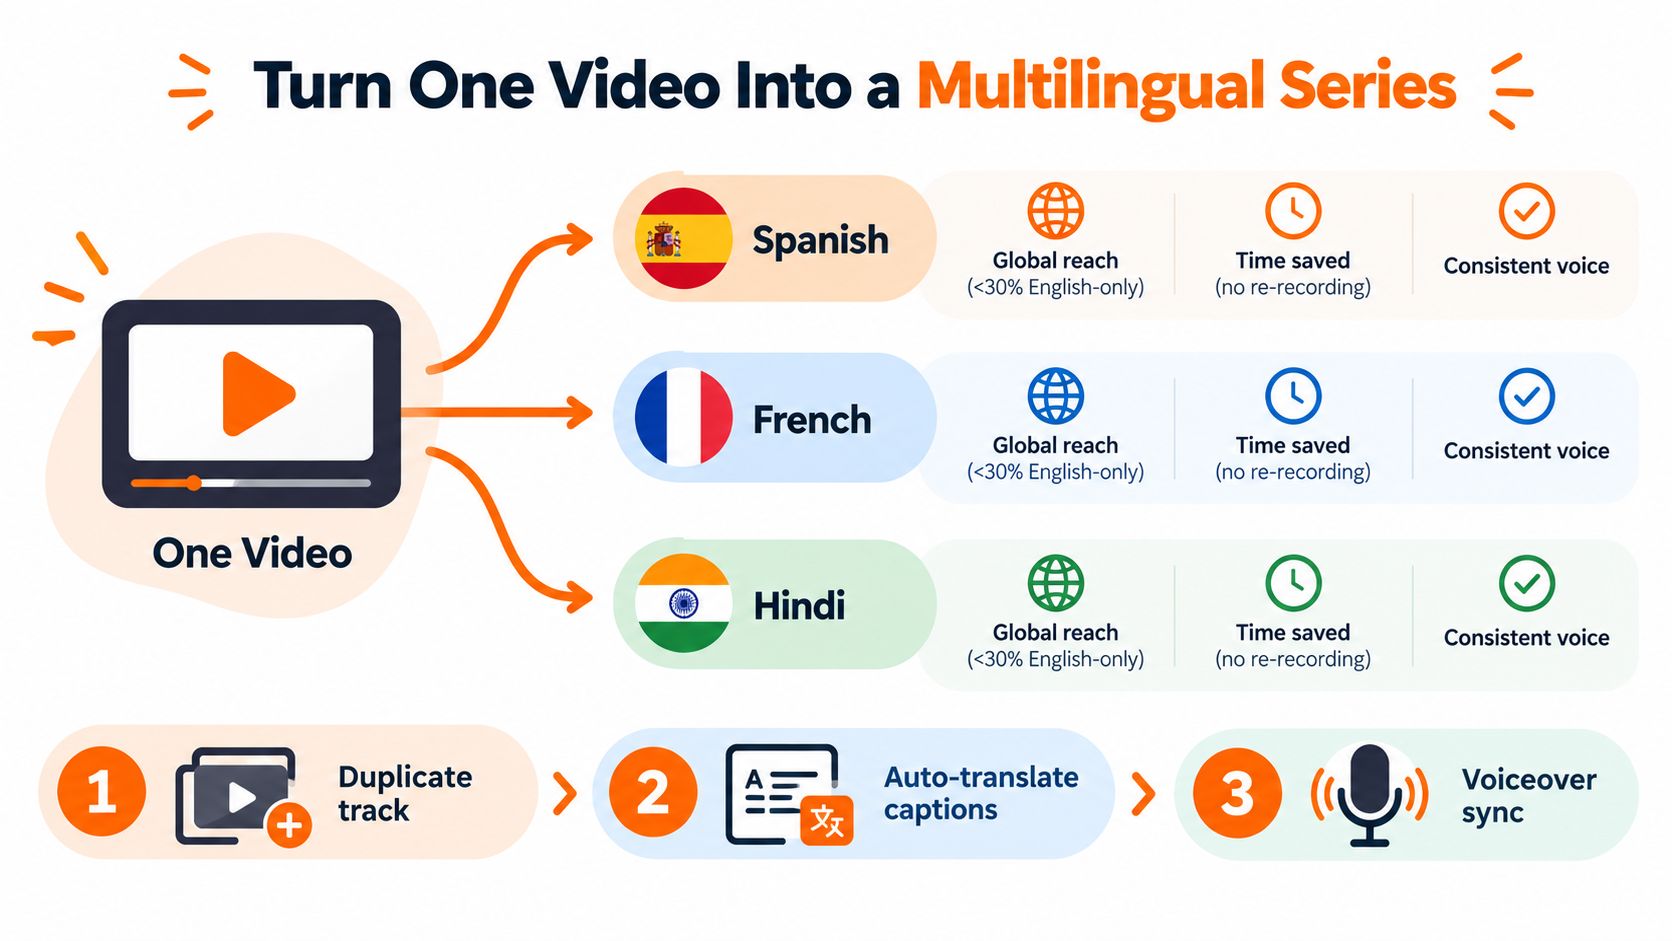
- Duplicate the master project. Preserve the original edit, then choose a locale-matched human or AI voice. Voice cloning can maintain continuity when the original speaker has approved its use, but don't treat cloning as permission by itself.
- Adapt the language layer. Translate the script, regenerate captions, and replace on-screen text. Review idioms rather than translating every phrase word for word. A technically accurate sentence can still sound unnatural or lose the intended emotional force.
- Re-time and verify. Move cuts to the new word boundaries instead of reusing the original cue points. Check pronunciation, lip-sync, caption wrapping, safe zones, and export dimensions for each destination.
Prioritize languages using audience analytics, customer support demand, and campaign performance. Don't select markets from intuition alone. For paid campaigns, add a native-speaker review before launch, particularly when the script contains humor, cultural references, claims, or product instructions.
The final check should compare versions side by side. Ask whether the same promise lands with the same urgency, whether the captions remain readable, and whether the voice sounds like a natural speaker rather than a translated file. A finished multilingual series is not one English video with replacement audio. It's a set of market-ready edits built from one controlled master.
<iframe width="100%" style="aspect-ratio: 16 / 9;" src="https://www.youtube.com/embed/bEH8I7uuhfo" frameborder="0" allow="autoplay; encrypted-media" allowfullscreen></iframe>ClipNova brings script drafting, voice-over generation, captions, synchronized visuals, multilingual re-voicing, and exports for 9:16, 1:1, and 16:9 into one workspace. Build your next master video, review the timing and captions, then visit ClipNova to turn that workflow into repeatable publish-ready versions.
Ready to ship your own?
Start creating viral videos with AI in under twenty minutes, no credit card required.