
You've got a clean horizontal interview, product demo, or webinar recording, and now you need versions for Shorts, Reels, TikTok, a square feed post, and a website. Changing the canvas is easy. Preserving the speaker's face, the product details, the captions, and the point of the video is the part that requires judgment.
The practical answer to how to change video dimensions isn't just choosing a preset and exporting. You need to decide what the new frame should keep, what it can remove, and whether the software can follow important content as it moves. A good resize creates a native-looking version for each placement, rather than a smaller video trapped inside the wrong shape.
Table of Contents
- Understanding Video Dimension Basics
- Preparing Your Project Before Resizing
- Deciding Between Crop Pad Scale and Reframe
- Cropping and Reframing Techniques for Key Ratios
- Export Settings for 9:16 1:1 and 16:9
- Maintaining Quality and Captions in Automated Studios
- Conclusion and Next Steps
<a id="understanding-video-dimension-basics"></a>
Understanding Video Dimension Basics
A speaker can remain centered in a horizontal interview yet disappear from a vertical crop. That outcome comes from the relationship between pixel width and height, called the aspect ratio. Two files can use different pixel dimensions while sharing the same ratio, so changing video dimensions also changes which parts of the composition stay visible.
The resizing problem has a long technical history. Early motion pictures commonly used 1.33:1, or 4:3. In 1932, the Academy standardized a wider 1.375:1 frame to accommodate optical sound tracks. Television kept the 4:3 shape through much of the twentieth century, while high-definition broadcasting later adopted 16:9, or 1.78:1, as a practical midpoint between 4:3 and wider cinema formats. RED's overview of video aspect ratios documents that progression.
Practical rule: A ratio change alters composition, not just the number of pixels.
Current workflows rely on a few recurring shapes. Horizontal video fits YouTube and web players. Vertical 9:16 matches phone-first short-form viewing. 1:1 and 4:5 can suit feed placements because square or moderately tall frames occupy more of the screen.
A blind resize creates three predictable problems:
- Cropping removes meaning: A tight crop can cut off a face, product edge, on-screen label, or hand gesture.
- Stretching distorts the image: Forcing a horizontal frame into a vertical canvas makes people and objects appear unnaturally wide or narrow.
- Padding reduces visual impact: Letterboxing or pillarboxing preserves the full image, but leaves the actual video smaller inside the destination frame.
The hidden trade-off is editorial. A crop may improve screen coverage while removing context. Padding protects context while weakening visual presence. Content-aware reframing can follow a face, product, or active speaker and preserve captions within the new frame, but it still requires review when several subjects compete for attention.
Mobile screens may be taller than the 9:16 publishing frame. A 2026 screen-resolution summary identifies common smartphone ratios of 20:9 for larger 6.7-inch-and-above devices and 19.5:9 for 6.1-inch devices, helping explain demand for tall exports alongside square and horizontal versions. The UNESCO resolution FAQ places older standard-definition and HD formats within the broader history of changing video delivery.
<a id="preparing-your-project-before-resizing"></a>
Preparing Your Project Before Resizing
Resizing works best when you treat it as a new edit, not as a final export trick. A destination frame may require different positioning, caption placement, scale, and even shot selection. Prepare the project so you can make those changes without damaging the original.
<a id="build-a-reliable-source-structure"></a>
Build a reliable source structure
Start with the highest-quality original footage available. Keep camera files, audio, graphics, music, caption files, and brand assets in separate folders, then duplicate the project before changing the sequence or timeline settings.
Use a simple checklist:
- Preserve the master: Store the original project and untouched media separately from resized versions. Never overwrite the source timeline with a vertical conversion.
- Inspect the footage: Confirm the source resolution, frame rate, orientation, and whether the camera recorded a cropped or variable-format image.
- Review the composition: Mark faces, products, logos, text, lower thirds, and any action that must remain visible.
- Check captions and graphics: Identify whether subtitles are baked into the image or exist as editable layers. Editable captions are much easier to reposition.
- Create destination timelines: Make separate sequences for 9:16, 1:1, and 16:9 so every variant can have independent framing.
- Save versioned exports: Use clear names that identify the ratio and revision, rather than repeatedly replacing one output file.
The frame rate should normally remain consistent with the source unless a specific delivery workflow requires a change. A conversion can look technically correct while still feeling wrong if motion becomes uneven, audio drifts, or captions no longer align with speech.
Layered project files also give you room to adjust individual elements. You can move a subtitle block upward in a vertical composition, reduce a logo's size, or reposition a callout without rebuilding the entire video.
If you're working on a lightweight device, choose an editor that can handle your source media and keep projects organized. This guide to editing solutions for Chromebook students can help you compare practical options before you begin.
<a id="deciding-between-crop-pad-scale-and-reframe"></a>
Deciding Between Crop Pad Scale and Reframe
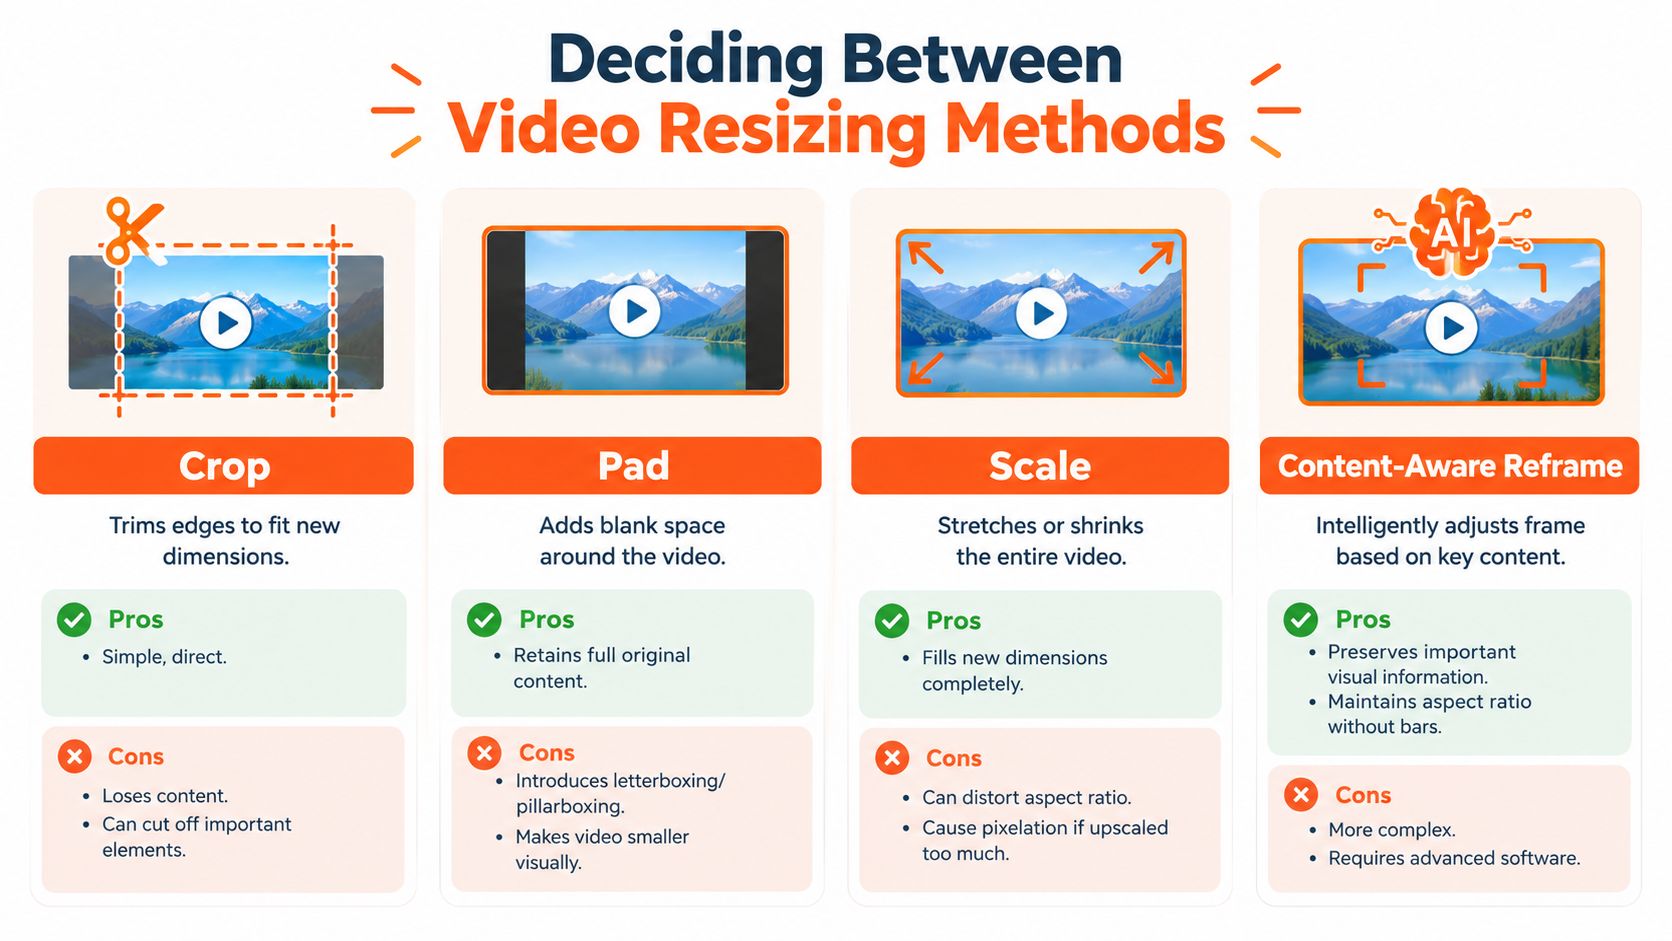
The destination ratio tells you the shape of the new canvas. It doesn't tell you how the footage should fit inside it. Editors generally choose among four approaches, and each one trades visual coverage against composition and quality.
<a id="crop"></a>
Crop
Cropping trims the edges until the source fills the new frame. It's fast and often works for a centered talking head, but it can remove a second speaker, product packaging, text, or movement near the edge.
Use crop when:
- The subject stays near the center.
- The outer edges contain expendable background.
- You can inspect the entire clip and confirm nothing important leaves the frame.
<a id="pad"></a>
Pad
Padding keeps the complete source image and adds empty space around it. This is the safest option for preserving information, especially when the source has a wide composition that cannot fit a tall canvas without loss.
The trade-off is presentation. Black bars, colored borders, blurred background fills, or branded panels can make the video feel like a repurposed asset rather than a native placement. A designed background is usually more intentional than plain black, but it still leaves the main footage visually smaller.
<a id="scale"></a>
Scale
Scaling changes the size of the complete image. Uniform scaling preserves the source ratio, but it may leave empty space. Non-uniform scaling fills the canvas by stretching the image and should generally be avoided because faces, typography, and products become distorted.
Upscaling can also soften fine details. If captions or small interface elements already look marginal in the source, enlarging them won't restore missing information.
<a id="content-aware-reframe"></a>
Content-aware reframe
Content-aware reframing changes the crop over time so the important subject stays visible. It can track a speaker, move between people, and create a more natural vertical composition from a horizontal source.
The method requires more setup and review than a static crop. Tracking can fail when a subject is briefly obscured, when several objects compete for attention, or when text is mistaken for the focal point. Automated results still need a human pass, especially around cuts, captions, and quick movement.
The most useful decision is often hybrid. Crop a static background, use padding for an information-heavy slide, and apply reframe to footage where a person or product moves through the frame.
<a id="cropping-and-reframing-techniques-for-key-ratios"></a>
Cropping and Reframing Techniques for Key Ratios
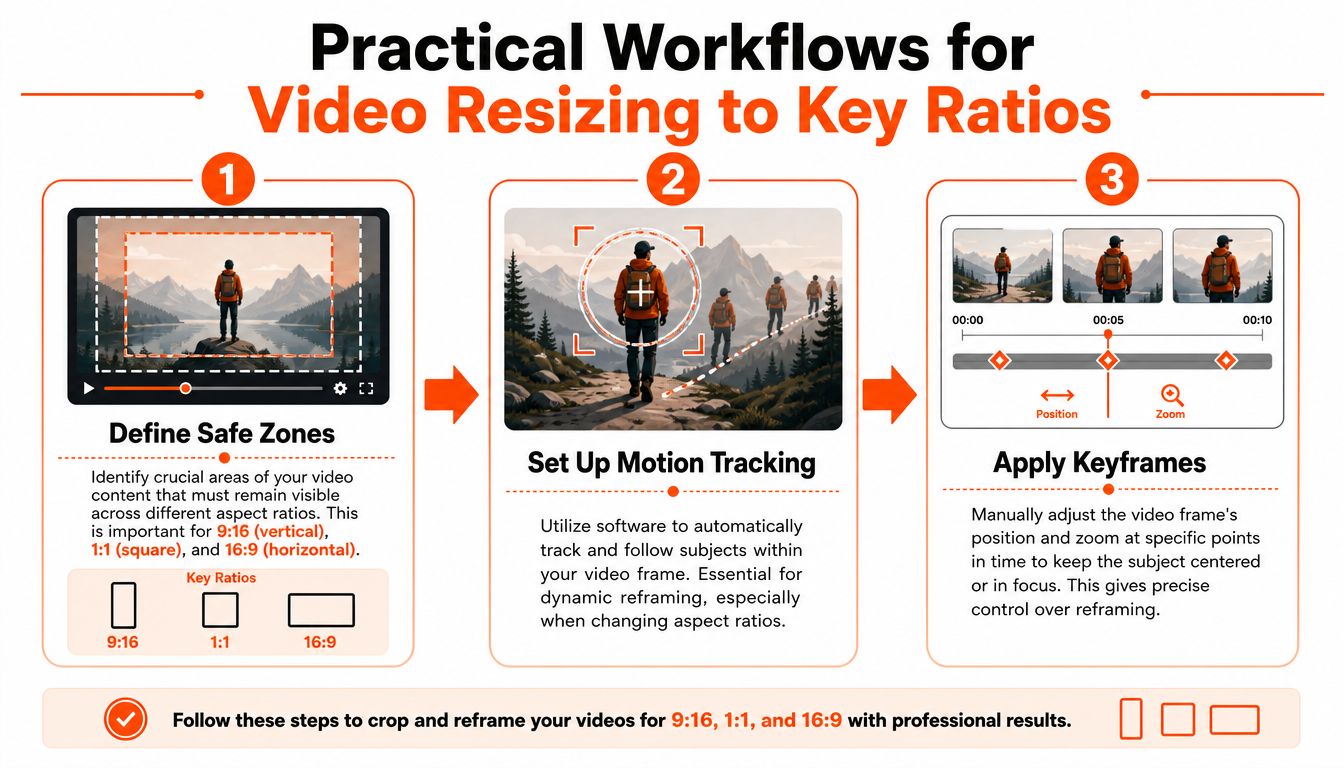
A reliable reframing workflow starts with the content, not the preset. Create the destination sequence, place the original clip on it, and decide which visual information must survive before adjusting scale or position.
<a id="step-one-define-the-safe-zones"></a>
Step one, define the safe zones
For a 9:16 version of a horizontal interview, begin with the speaker's face and shoulders. Keep the eyes comfortably inside the central area, then check whether captions, logos, and platform interface overlays could compete with the bottom or top of the frame.
A square 1:1 crop gives you more width than a tall frame but still removes substantial horizontal context. It can work well for a single presenter or a centered product shot. If two people sit at opposite sides of a wide interview, a single square crop may not serve both, so consider a deliberate cut between speakers or a wider padded treatment.
A 16:9 version of vertical product footage creates the opposite problem. You may need a background extension, a duplicate blurred layer behind the source, or a redesigned layout with the product on one side and supporting text on the other. Don't stretch the vertical image across the horizontal canvas.
<a id="step-two-set-up-motion-tracking"></a>
Step two, set up motion tracking
Choose the face, product, or object that carries the action and apply motion tracking if your editor supports it. Review the tracking path through the whole clip, not just the opening frame. A person can lean, turn, walk, or leave the shot, and each movement changes whether the crop still communicates clearly.
For a horizontal interview converted to vertical, tracking can keep the active speaker centered. For a product demonstration, tracking can follow the item while leaving enough surrounding space for labels and captions.
<a id="step-three-apply-keyframes"></a>
Step three, apply keyframes
Keyframes give you manual control over position and zoom. Place an initial keyframe before the subject moves, add another as the subject changes position, and adjust the transition so the frame follows smoothly rather than snapping.
Keep movement restrained. A crop that constantly chases tiny shifts can feel more distracting than a slightly imperfect static frame. At every cut, check the first and last frames of the shot, because the correct position for one shot may be wrong for the next.
Use a short test export before rendering the entire project. Watch it on a phone and a desktop display, then inspect caption clearance, facial framing, product visibility, and transitions. For larger batches, automate video editing when repeated reframing and version creation are consuming more time than editorial decisions.
<iframe width="100%" style="aspect-ratio: 16 / 9;" src="https://www.youtube.com/embed/KH0uuFtq7ww" frameborder="0" allow="autoplay; encrypted-media" allowfullscreen></iframe><a id="export-settings-for-916-11-and-169"></a>
Export Settings for 9:16 1:1 and 16:9
Export for the destination, then verify the result after compression. The aspect ratio sets the frame shape, but the delivery file also depends on source resolution, codec, frame rate, color handling, and caption placement. A technically correct canvas can still produce a poor video if the crop removes context or leaves text outside the visible area.
Legacy footage makes the trade-off clear. Common formats included 720×480 for NTSC DVD and miniDV-era video and 720×576 for PAL and SECAM-era video, while later delivery moved to 1280×720 HD and 1920×1080 full HD. Those formats show why enlarging a small source cannot restore missing detail. UNESCO's video-resolution reference provides useful background on these resolutions.
<a id="resolution-guide-for-common-aspect-ratios"></a>
Resolution guide for common aspect ratios
| Aspect Ratio | Resolution | Use Case |
|---|---|---|
| 9:16 | 1080×1920 | Vertical short-form video, Stories, and Reels |
| 1:1 | 1080×1080 | Square feed posts and compact social placements |
| 16:9 | 1920×1080 | YouTube, websites, presentations, and standard horizontal delivery |
These targets suit a full-HD source. If the original is smaller, avoid enlarging it to match a preset. A lower-resolution export with clean edges and readable captions may look better than a soft upscale with aggressive sharpening.
<a id="codec-and-compression-choices"></a>
Codec and compression choices
H.264 in an MP4 container remains a practical choice for broad compatibility. Preserve the source frame rate, use a constant frame rate when possible, and export from the master rather than compressing an already compressed version.
Compression has two common failure points. Too much compression creates blocky motion, muddy gradients, and unreadable small text. Too much data produces a larger file without repairing a bad crop or soft footage. Set the composition first, inspect quality second, then adjust compression.
Color management also affects the final result. Keep the project in a standard delivery color space unless the destination requires another setting. Check skin tones, bright highlights, dark areas, and caption contrast after encoding.
Presentations need a separate review because slides often use small text, fixed layouts, and screen recordings. For a presentation or instructional video headed to YouTube, see this guide to uploading PowerPoint to YouTube. Watch the exported file itself on the intended device. The editor preview may not reveal encoding defects, clipped captions, or a reframed slide that no longer preserves its meaning.
<a id="maintaining-quality-and-captions-in-automated-studios"></a>
Maintaining Quality and Captions in Automated Studios
Manual resizing becomes expensive when every version contains separate caption layers, animated graphics, voiceover timing, and B-roll. A static crop can move a caption over a face, place a subtitle outside the visible frame, or hide a key graphic while the audio continues perfectly.
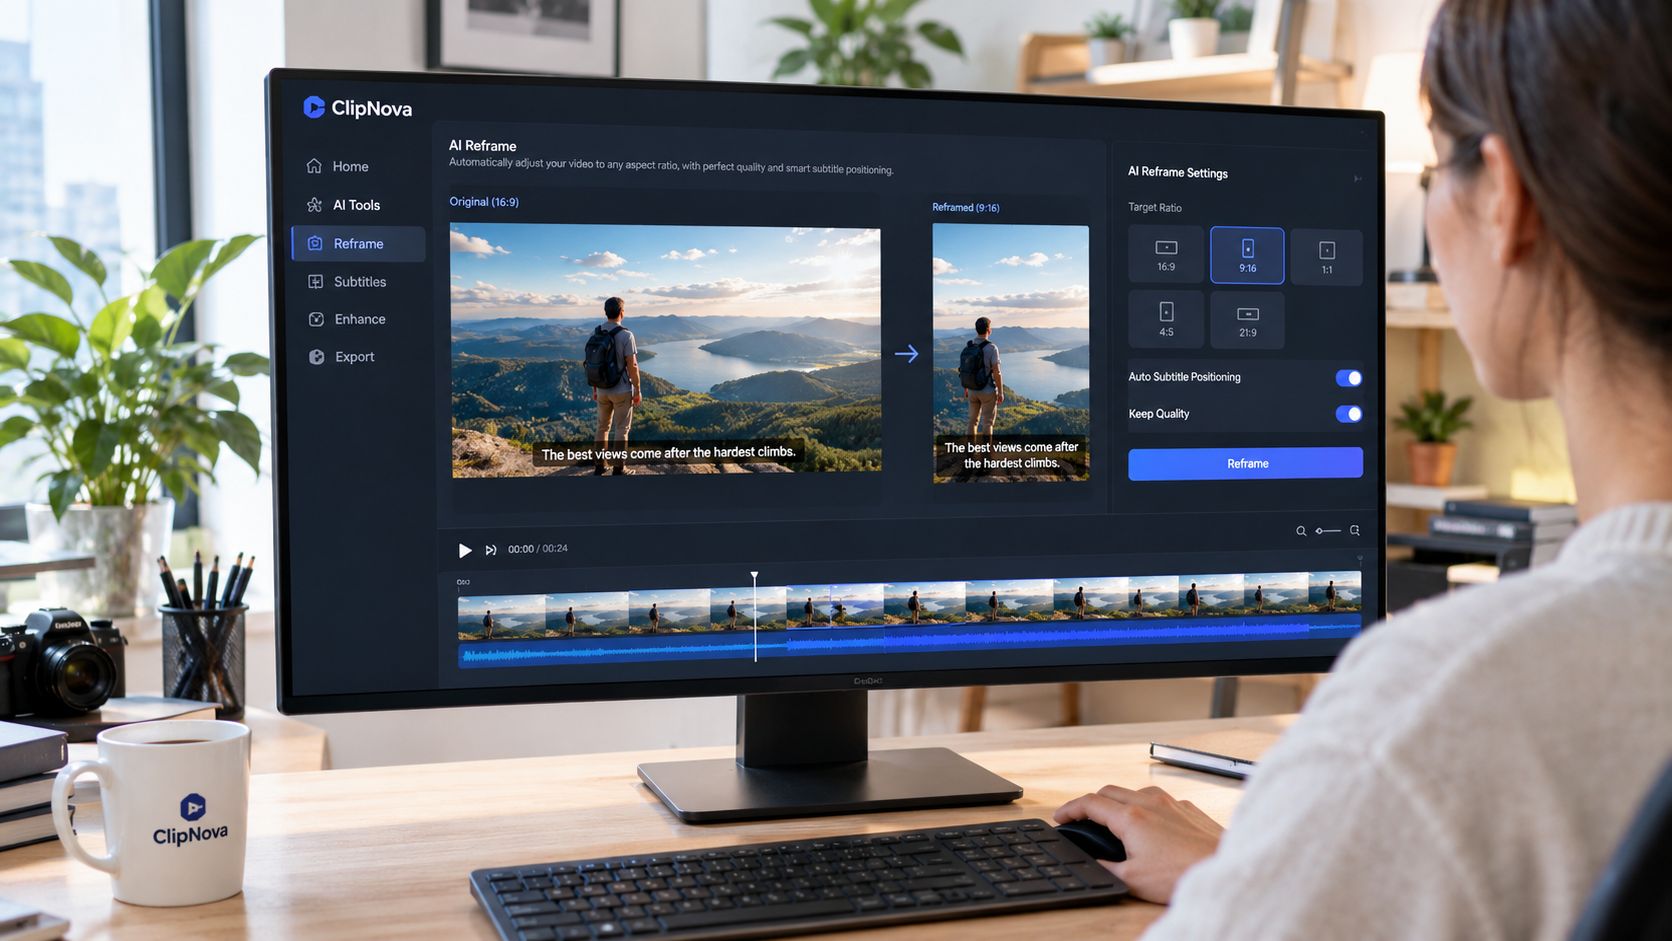
AI-driven reframing addresses the editorial problem by treating the frame as content rather than an empty rectangle. The system can identify a face or product, adjust the crop as the subject moves, and reposition captions for the new composition. That doesn't eliminate review. It changes the editor's job from rebuilding every version to checking decisions and correcting exceptions.
<a id="a-practical-automated-workflow"></a>
A practical automated workflow
Start with a clean source or generate the project from a natural-language prompt. Define the subject, tone, voice, visual direction, and intended placement before rendering. A clear brief gives the system useful context for selecting scenes and arranging the frame.
Next, create the master edit with the narration, B-roll, music, and captions. Keep captions editable whenever possible. Burned-in subtitles become part of the image, so the software has less control over their position and styling during a ratio conversion.
Then render the required variants. ClipNova provides automated scripting, voiceover, visuals, captions, music, and exports in 9:16, 1:1, and 16:9 from one workspace, according to the publisher's product information. Its voiceover tools support 32 languages, and paid plans include watermark-free 1080p and 4K exports with commercial rights, as described in the supplied product data. Those product details should be checked against the current plan before purchase.
Caption integrity deserves its own review. Compare the transcript with the spoken audio, check line breaks, confirm that text stays inside the visible safe area, and make sure captions don't cover a face or the product detail that viewers need to understand. The workflow described in how to add subtitles to a video is relevant when captions need to be created or corrected before generating multiple layouts.
Editor's judgment: Automation is useful when it preserves editorial intent. Approve the crop, tracking, captions, and transitions before publishing.
Export a short sample of each ratio and inspect it on the device where viewers will encounter it. Check the first frame, a busy middle section, a caption-heavy moment, and the final call to action. Automated tools save the most time when they handle repetitive work while an editor still controls the final interpretation.
<a id="conclusion-and-next-steps"></a>
Conclusion and Next Steps
Changing video dimensions means protecting the message while changing the frame. Choose crop when the edges are expendable, pad when complete coverage matters, scale only when proportions stay intact, and reframe when the subject moves. Build separate timelines, inspect safe zones, keep captions editable, and export distinct variants instead of forcing one master file into every placement.
Start with one representative clip, create 9:16, 1:1, and 16:9 versions, and compare them on their intended screens. Then test different openings or framing choices, review retention and completion behavior in your own channels, and add automated reframing to the parts of the workflow that repeat without requiring fresh editorial judgment.
Use ClipNova to generate or re-render short-form videos with synced voiceover, captions, visuals, and multi-aspect exports in one workspace. Create a source project, produce the required 9:16, 1:1, and 16:9 variants, and review each frame before publishing.
Ready to ship your own?
Start creating viral videos with AI in under twenty minutes, no credit card required.