
The most popular advice for adding subtitles is simple: run auto-captions, skim the transcript, and export. That's how a video ends up with a character's name spelled three different ways, dialogue assigned to the wrong speaker, or a punchline revealed before it's spoken. For a long story video, subtitles need a quality-control pass, not just a button click.
A reliable workflow separates the work into four stages: prepare the final video and its script, generate same-language captions, edit their timing and wording, then translate and check how they look in the finished frame. That structure makes errors easier to catch, especially in videos with recurring characters and fast exchanges.
Table of Contents
- What Subtitles Really Are and Why the Workflow Matters
- Preparing Your Video Before You Add Subtitles
- Choosing the Right Caption Method for Your Project
- Editing Timecodes, Line Breaks, and Character Speed
- Translating Subtitles Without Breaking Readability
- Placement, Contrast, and Safe Area on 9:16, 1:1, and 16:9
- A Reusable QC Checklist and Where Auto-Captions Still Fall Short
<a id="what-subtitles-really-are-and-why-the-workflow-matters"></a>
What Subtitles Really Are and Why the Workflow Matters
Subtitles aren't text printed over a frame. They're timed text cues: each event pairs words with a start time and an end time, telling the player when to show and remove them. WebVTT and SRT store these cues in editable files, so you can adjust wording and timing without rebuilding the video.
The W3C describes captions as synchronized with the media resource. In practical terms, the audio and picture set the timing reference. A cue that starts at a scene cut instead of with the spoken line can feel late, even if the words are correct. A cue that stays up too long can give away a reaction or joke before the audience hears it.
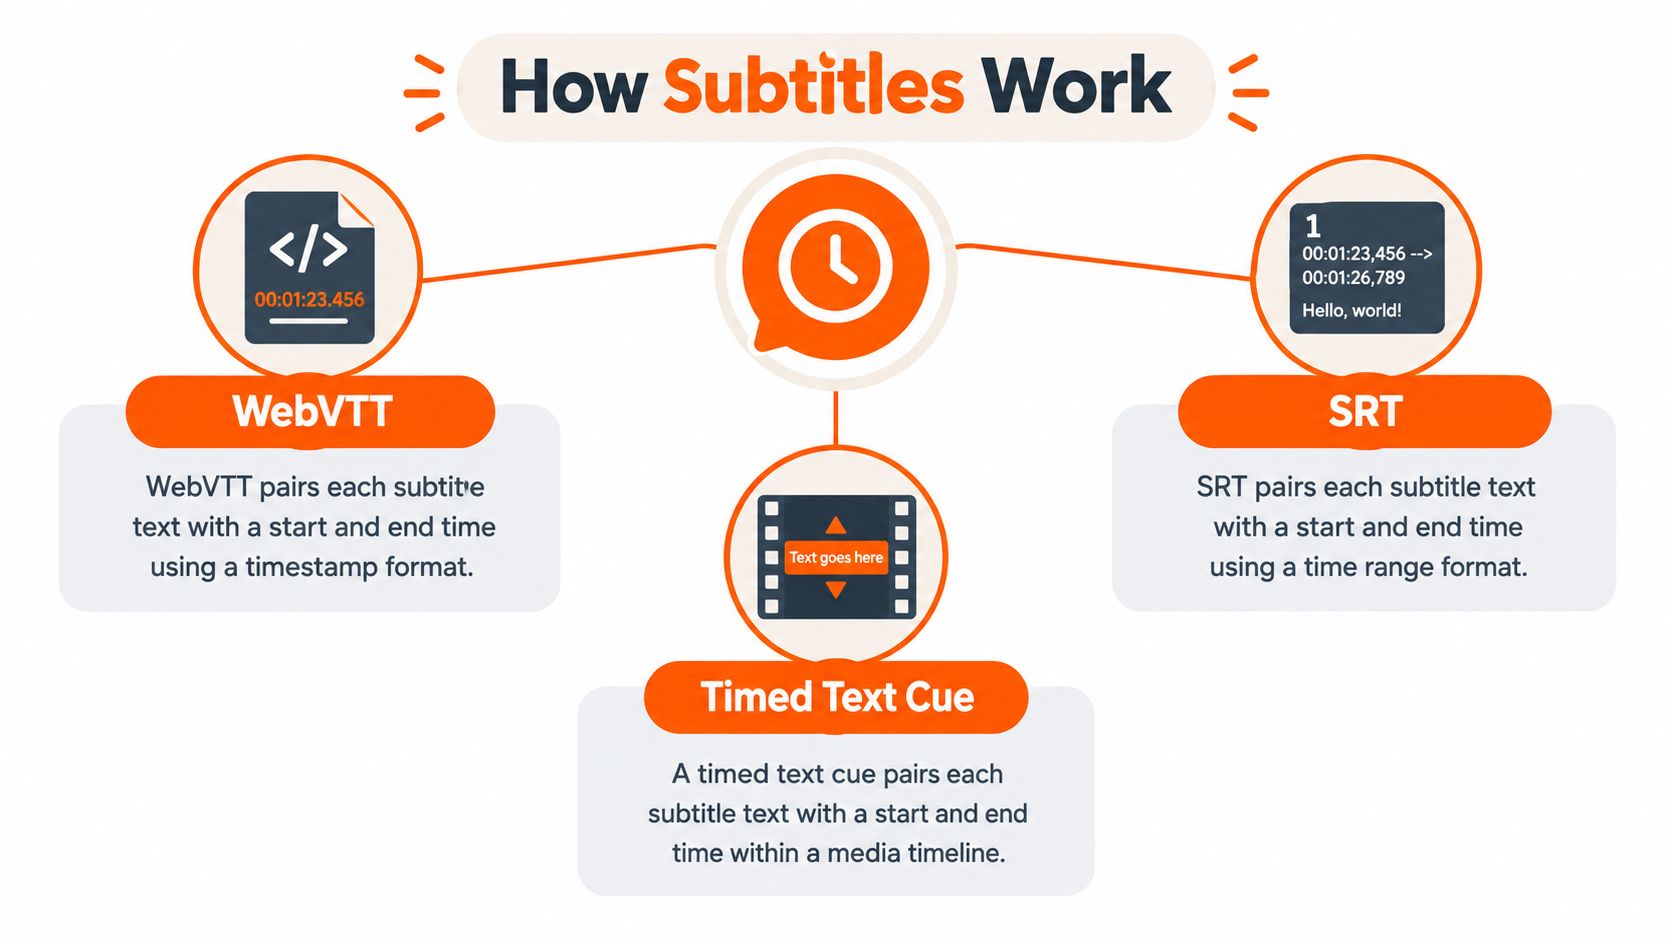
A sidecar file is a separate subtitle track, such as an SRT or WebVTT file, that a compatible player can display alongside the video. Burn-in means the text is rendered permanently into the video image. Sidecar files are easier to edit and reuse for translations; burned-in subtitles are predictable on platforms that don't display uploaded tracks.
Captions and subtitles also serve different needs. Subtitles generally reproduce or translate dialogue. Accessibility captions should also convey meaningful audio that isn't spoken, such as a door slamming, an alarm, or music that affects the scene. The W3C explains the distinction in its guidance on captions and subtitles.
Practical rule: Treat the subtitle file as a production asset. It should be timed, edited, and checked against the final video, not just generated and forgotten.
That's the foundation for how to add subtitles to video without treating them as decoration. For another creator-focused overview of the process, see this subtitle guide for creators.
<a id="preparing-your-video-before-you-add-subtitles"></a>
Preparing Your Video Before You Add Subtitles
Subtitle tools work from audio, so give them a stable source. Lock the edit and final voice track first. If you change a cut or replace narration after generating captions, cue timings may no longer match, and you'll have to review the affected scenes again.
Keep a clean script nearby, even if the video was generated from an idea rather than a finished screenplay. Use it to verify names, specialist terms, numbers, and intended wording. A script is a reference, not proof that the spoken audio matches it. Listen to the final voice track when a line has changed during recording or editing.
For stories with recurring characters, make a cast list with each name's approved spelling and keep it with the project. If you're producing a ClipNova Series, save and reuse the cast list across episodes. That small habit helps prevent automatic transcription from spelling the same character's name differently from one instalment to the next.
Before opening a caption tool, check:
- Final audio: The voice track and edit are locked.
- Script: You have a clean reference for names, terminology, and dialogue.
- Speakers: You know who speaks, and where voices overlap.
- Language: You've identified the spoken language and the languages you plan to publish.
- Recurring details: Character names and any repeated terms are documented.
This preparation won't make automatic transcription flawless. It does make its mistakes faster to identify, because you're comparing the captions to a defined source rather than guessing what a character said.
<a id="choosing-the-right-caption-method-for-your-project"></a>
Choosing the Right Caption Method for Your Project
There are three useful routes. Platform auto-captions are convenient when you're publishing directly to YouTube, TikTok, or LinkedIn and only need a track for that platform. Dedicated transcription services are a better fit when you want a reusable text file. Editing software gives you tighter control over appearance and timing, especially when you're burning text into the picture.
| Method | Best for | Editable | Common output | Languages | Timing control |
|---|---|---|---|---|---|
| Platform auto-captions | Quick publishing to one platform | Usually editable in-platform | Platform caption track | Varies by platform | Basic to moderate |
| Auto-caption or transcription tool | Reusable captions and transcript drafts | Usually | SRT or WebVTT, depending on tool | Varies by tool | Moderate |
| Video editing software | Styled, burned-in captions and detailed fixes | Yes | Rendered video, sometimes a sidecar file | Varies by software | High |
Platform-generated captions can be fast, but they may be harder to carry into another workflow. A dedicated tool can make it easier to keep a master file, but you still need to confirm that its export format works with your destination. An editor gives you visual control, though that flexibility can add hands-on work.
ClipNova fits the source-video part of this workflow: it creates finished long AI videos, with script, scenes, voiceover, captions, and background music made in one pass. Its videos can run up to 5 minutes at up to 1080p, with recurring characters, lip sync, and narration in 18 languages. The generated captions still deserve a human check, particularly for names, speaker attribution, and timing. For a closer look at generation options, see this video caption generator guide.
Choose the route based on what you need to hand off next. If the next step is a platform upload, an in-platform track may be enough. If you're translating, revising, or publishing across services, keep an editable SRT or WebVTT master.
<a id="editing-timecodes-line-breaks-and-character-speed"></a>
Editing Timecodes, Line Breaks, and Character Speed
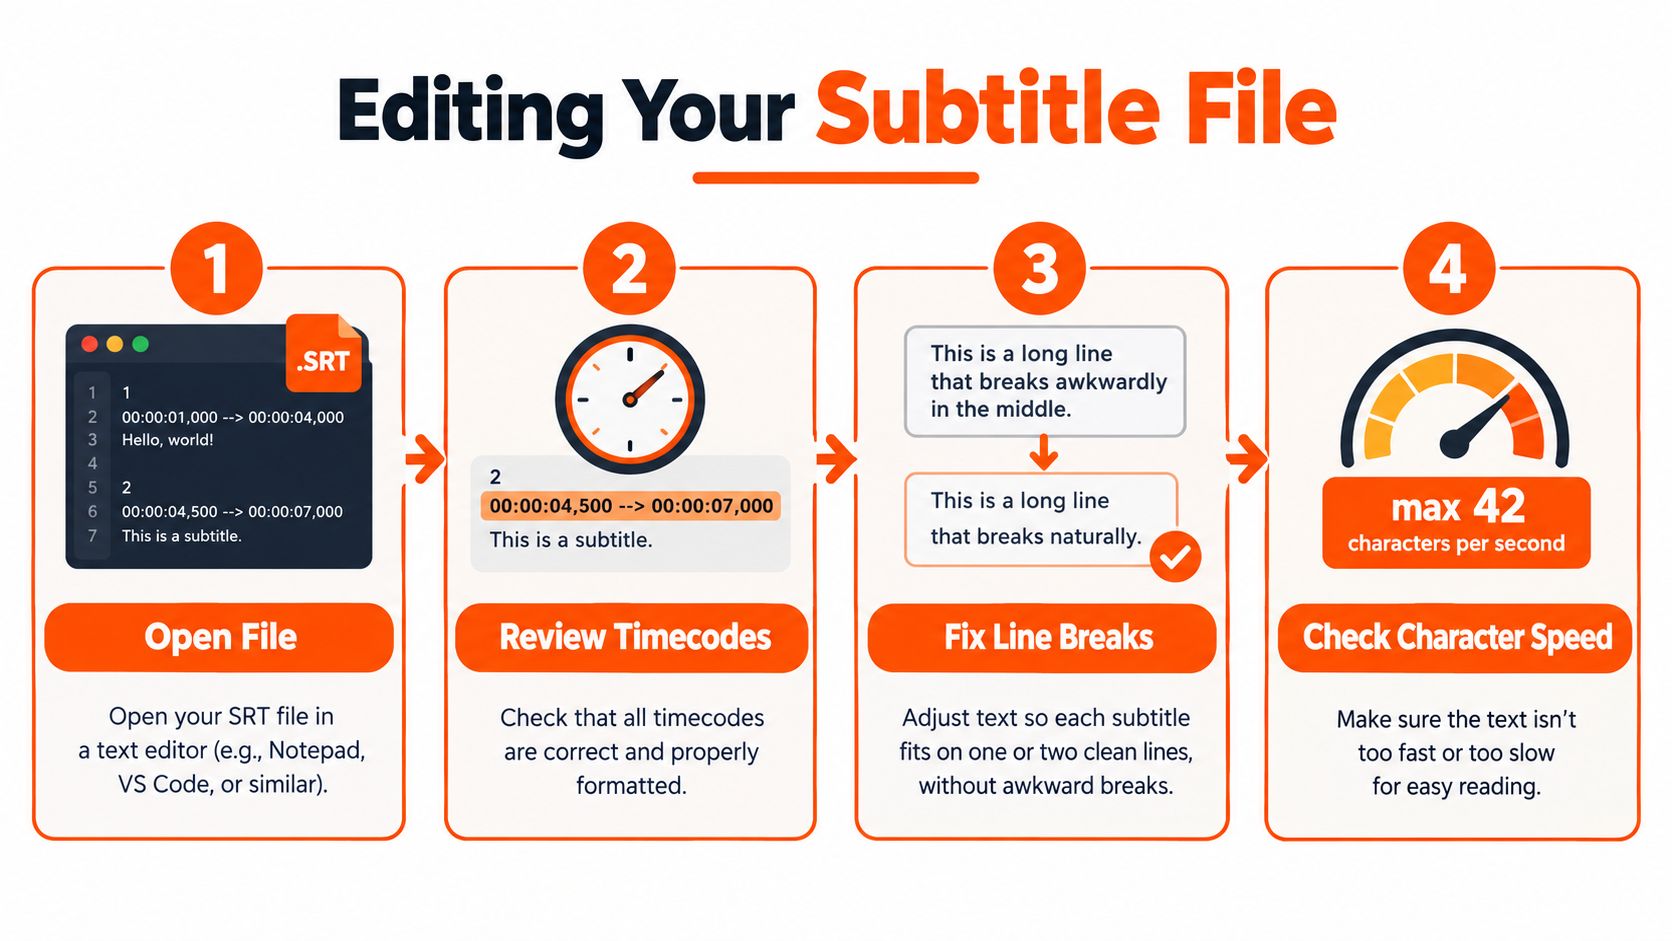
Open the SRT or WebVTT file beside the final video and waveform. Review each cue while listening, not just by reading the transcript. Correct the words first, then adjust the cue's in and out points so they follow the spoken audio rather than a nearby cut.
For Latin-alphabet subtitles, a practical starting point is no more than 42 characters per line, with no more than two lines per event. Keep each event on screen for at least 0.83 seconds and no more than 7 seconds, and aim for no more than 17 characters per second for adult English content. These are working limits, not a substitute for watching the result. Netflix's timed text style guide offers further production guidance.
Work through the file in a consistent order:
- Fix transcription: Check names, numbers, punctuation, negations, and words that change the meaning.
- Correct timecodes: Start cues with the speech or sound they represent. Don't use a scene cut as a timing shortcut.
- Repair line breaks: Split at natural grammatical boundaries so viewers don't have to hold an unfinished phrase in memory.
- Check pace: Read each cue at normal playback speed. Shorten or divide lines that flash by too quickly.
Automatic captions often split a phrase between cues, start dialogue late, or assign two speakers identical timings when they overlap. Add speaker identification when it's necessary to follow who's talking, and preserve a meaningful pause rather than filling every silence with text. A cue can be technically valid and still feel wrong in motion.
Editor's check: Watch the complete video at normal speed after editing. A file preview can't tell you whether a line lands too early or whether a fast exchange is actually readable.
If you have an audio-only source or want to create a timed transcript before working in your editor, a tool to create subtitles from audio files can help with the initial draft.
<iframe width="100%" style="aspect-ratio: 16 / 9;" src="https://www.youtube.com/embed/pR1vap0pYFQ" frameborder="0" allow="autoplay; encrypted-media" allowfullscreen></iframe><a id="translating-subtitles-without-breaking-readability"></a>
Translating Subtitles Without Breaking Readability
Translate only after the same-language captions are accurate. Export a clean SRT or WebVTT master, then translate the dialogue while preserving cue order and timing as a starting point. Translating an incorrect caption just gives you a polished version of the wrong line.
Review each translated cue for meaning, not just word matching. Check idioms, names, cultural references, and jokes that depend on the original phrasing. If a character's wording is meant to sound formal, playful, or frightened, make sure the translation preserves that tone rather than flattening it into a literal transcription.
Some languages take more screen space than the English master. German, Spanish, and Russian lines may need different breaks or longer display time, so don't assume that an English line layout will fit unchanged. Rewrap the text at natural phrase boundaries and check that viewers can read it at normal speed.
ClipNova offers narration in 18 languages, which can support republishing a story with a different spoken-language track. A translated voice track doesn't replace translated subtitles when viewers need them. Keep each language version paired with the right caption or subtitle file, and review the final combination rather than assuming the original timing still fits.
For projects that use generated narration, this guide to AI voiceover tools can help with planning the audio side of a multilingual workflow. Regardless of how the voice is made, check the names and spoken wording against the final track in each language.
<a id="placement-contrast-and-safe-area-on-916-11-and-169"></a>
Placement, Contrast, and Safe Area on 9:16, 1:1, and 16:9
A correctly timed subtitle can still fail if it covers a face or disappears under a platform control. Preview captions over the actual video, on the intended device and aspect ratio. FCC guidance says captions shouldn't obscure important visual information, run off the screen, or overlap one another. The FCC captioning guidance also stresses readable presentation and synchronization with the corresponding speech or sound.
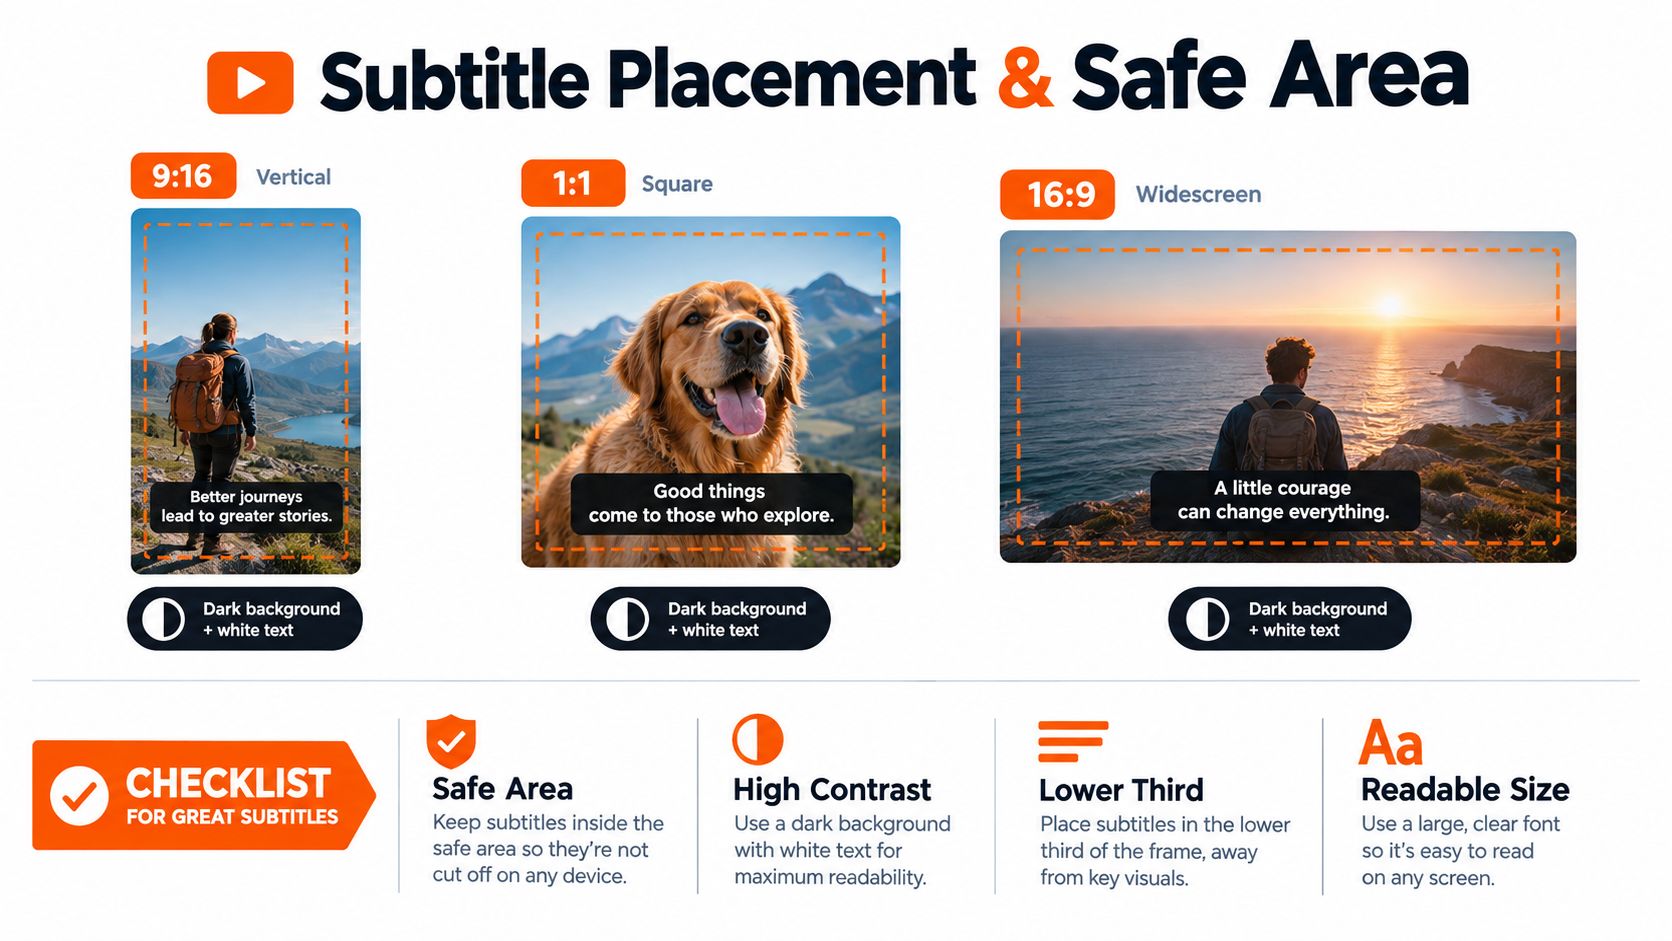
- 9:16 vertical: Lower-center placement is a useful starting point, but check that captions clear platform buttons and descriptions. Move them if they cover a face, product, or important action.
- 1:1 square: Keep the text balanced within the frame. A lower-third line can crowd a subject whose face or hands already sit low in the image.
- 16:9 widescreen: Preview both the full player and smaller previews. Text that reads well on a desktop can become difficult to see in a compact feed.
Use strong contrast, adequate text size, and a background or outline when the scene changes make plain text hard to read. Don't burn captions into the video until you've checked every scene, because those placement choices are permanent in the exported image.
A sidecar subtitle track remains editable and can be turned on or off in a compatible player. Burn-in is useful when a platform or workflow doesn't display sidecar captions, but you lose that flexibility. For a broader look at aspect ratios and platform requirements, consult this guide for multi-platform video teams.
<a id="a-reusable-qc-checklist-and-where-auto-captions-still-fall-short"></a>
A Reusable QC Checklist and Where Auto-Captions Still Fall Short
Use this checklist before publishing:
- Lock the source: Confirm the cut and final audio are settled.
- Check names: Verify recurring character names and specialist terms.
- Review timing: Match every cue to speech and meaningful sound.
- Check line length: Keep breaks natural and reading speed manageable.
- Review translation: Confirm idioms, tone, and names in each language.
- Inspect placement: Check safe areas, contrast, faces, and important visuals.
- Play it muted: Watch the complete finished video on a phone to catch missed meaning and visual collisions.
Automatic captions are a draft, not a publishing standard. Long stories with recurring characters make wrong names, missed negations, and speaker mix-ups harder to spot, so check each scene rather than relying on a quick transcript skim. For creators building a repeatable production workflow, this guide to automating video editing offers additional process ideas.
ClipNova makes finished AI videos up to 5 minutes, with consistent characters, script, scenes, voiceover, captions, and music created in one pass. Choose 9:16, 16:9, or 1:1, then review the captions and scenes before posting. Make your first video with ClipNova AI.
Ready to ship your own?
Start creating viral videos with AI in under twenty minutes, no credit card required.