

You've cut out a product photo for a marketplace listing, removed the clutter behind a speaker for a thumbnail, or isolated a pet for a social post. The first result looks impressive until you zoom in. A few hairs have vanished, the glass edge has a gray halo, and the subject still carries a faint shadow from the original scene.
That's where background removal AI becomes more than a one-click trick. The tool isn't deleting pixels. It's deciding which pixels belong to the subject, which belong to the background, and which sit somewhere between the two. Those decisions affect whether the final image looks natural or artificially clipped.
The practical question isn't only, “Can AI remove this background?” It's also, “Should I remove it at all, what kind of cutout does this image need, and can the result fit my production workflow?” The answers depend on the subject, the image context, the export format, and how much review your team can provide.
Table of Contents
- Introduction to Background Removal AI in Modern Workflows
- How Background Removal AI Works Behind the Scenes
- What Determines Accuracy and Where AI Still Struggles
- Best Practices for Clean Cutouts on the First Try
- File Formats Transparency and Export Options Explained
- Integrating Background Removal Into Image and Video Workflows
- Putting It All Together and Choosing Your Next Step
<a id="introduction-to-background-removal-ai-in-modern-workflows"></a>
Introduction to Background Removal AI in Modern Workflows
A creator preparing a product carousel might begin with a dozen photos taken in different rooms. One has a desk in the background, another includes a visible cable, and a third has uneven lighting across the wall. Manually tracing every object would interrupt the design process, so the creator uploads the images to an AI background remover, downloads transparent cutouts, and places each product into a consistent layout.
That workflow is useful because it turns a tedious selection task into a fast first pass. It helps bloggers update old graphics, online sellers prepare product images, and video teams isolate people or objects before placing them over new scenes. A resource such as Nim's product cutout creator can be useful when the immediate need is a clean subject extraction for creative work.
But speed doesn't guarantee correctness. A clean-edged box is much easier to isolate than a wine glass, a veil, curly hair, or a mesh garment. The software must interpret visual evidence, not just detect a convenient color boundary.
Working principle: Treat an AI cutout as an editable decision, not an unquestionable final image.
This distinction matters for machine-learning projects too. A fashion-image study found that background removal improved classification, particularly for simpler models trained from scratch, but it didn't improve instance segmentation or semantic segmentation because those tasks depend on spatial and contextual information that disappears when the background is stripped away (fashion-image study).
The guide ahead moves from the underlying mechanics to practical use. You'll learn how segmentation and matting differ, why transparent and reflective objects cause trouble, how to prepare images for cleaner first attempts, which formats preserve transparency, and how to judge privacy, batch processing, and integration before adopting a tool.
<a id="how-background-removal-ai-works-behind-the-scenes"></a>
How Background Removal AI Works Behind the Scenes
A product photo arrives with a plain wall behind it, and the goal is to place the product in a new scene. The AI does not just “delete the wall.” It first decides which pixels belong to the subject, then estimates how firmly each boundary pixel belongs there.
At the simplest level, background removal separates an image into two areas:
- The foreground, such as a person, product, pet, or logo.
- The background, such as a wall, table, room, or scene.
A basic segmentation system works like digital scissors. It gives each pixel a binary decision, keep it or remove it. This approach can produce a clean cutout when the subject has a distinct outline and strong contrast. A product cutout creator may use this kind of first pass to isolate a subject quickly.
The difficult evidence sits along the boundary. In a portrait with loose hair, some pixels show mostly hair, others mix hair with the background, and some contain a soft transition caused by focus, movement, or lighting. A binary mask has only two choices, so it can create jagged edges, lose strands, or leave a visible fringe.
<a id="segmentation-creates-the-rough-outline"></a>
Segmentation creates the rough outline
Salient-object segmentation identifies the visually important subject. It suits images where the object is clear and the desired result is a solid cutout. The model estimates a mask that marks the subject area, similar to filling a shape without yet refining its border.
Image matting estimates more detail. Rather than labeling every pixel only as “foreground” or “background,” it assigns an alpha value, showing how strongly that pixel belongs to the foreground. A solid shirt pixel remains opaque. A pixel containing a fine hair strand may remain partly transparent. That gradual transition helps the edge retain a natural appearance.
A matting survey describes systems based on RGB-Trimap and RGB-Background inputs, evaluated with alpha-quality measures including SAD, MSE, Grad, and Conn (a matting survey). You do not need to calculate these measures when using an AI tool. They clarify an important distinction: a mask may have the right overall shape while still failing at the narrow edge viewers notice first.
<a id="why-the-unknown-region-matters"></a>
Why the unknown region matters
A trimap divides the image into three zones:
- Known foreground, where the model is confident the subject exists.
- Known background, where the model is confident the subject does not exist.
- Unknown region, where the boundary requires estimation.
Hair, fur, translucent fabric, reflections, and soft shadows often occupy the unknown region. A matting model concentrates its effort there instead of treating every contour as a hard line.
Training and evaluation at high resolution also affect what a model can preserve. The DIS5K dataset contains 5,470 high-resolution images at 2K/4K and above, created to test fine-detail extraction. Such testing matters because a cutout can look acceptable as a thumbnail yet show broken edges when enlarged for packaging, print, or a full-screen video frame (the DIS5K high-resolution segmentation dataset).

The practical distinction is clear. Binary segmentation gives you the shape. Matting tries to preserve the character of the edge. Hard, solid boundaries may work well with either method. Hair, glass, and fabric that reveal the original scene need alpha-aware processing and a closer review of the result.
<a id="what-determines-accuracy-and-where-ai-still-struggles"></a>
What Determines Accuracy and Where AI Still Struggles
A cutout can look convincing in a thumbnail and fail when placed on a large product banner. The difficulty is set before processing begins. A dark shoe against a pale, evenly lit background gives the model strong separation. A black jacket against a dark sofa provides weaker evidence, so the system must infer the outline from texture, folds, and small changes in contrast.
Lighting can create misleading edges. Backlighting may produce a bright rim around a person, while a hard cast shadow can resemble part of the subject. Reflections create another ambiguity. On a polished product, the surrounding room may appear across the surface, making it unclear whether a color patch belongs to the object or its environment.
<a id="easy-subjects-and-difficult-boundaries"></a>
Easy subjects and difficult boundaries
Solid-edged products usually provide a stable contour. Boxes, books, packaged goods, and many electronic devices tend to remain visually distinct even when the background changes. Their boundary behaves like a clean stencil.
The harder category includes transparent, reflective, and semi-transparent subjects. Glassware, eyewear, water bottles, veils, and mesh can contain the background inside the object itself. Removing that background while preserving the object requires the model to estimate refraction, highlights, and partial opacity rather than label each pixel as subject or background.
Independent evaluations show a clear gap between solid-edged products and complex boundaries. One 2025 benchmark across 10,000 ecommerce images reported best-in-class performance of 78% on transparent and reflective products, compared with 94–97% on apparel, electronics, and packaged goods (background-remover guide). The same source also describes a 2026 analysis reporting roughly 85% accuracy on simple products and less than 60% on complex edges such as hair, glass, and mesh. These results come from different evaluations, so they are not a universal score. Their practical lesson is consistent: a tool that handles a clean shirt may still need human review for a glass tumbler.
<a id="what-failure-looks-like"></a>
What failure looks like
A cutout often fails in a small area rather than across the whole image:
- Halos: A light or dark fringe remains because background-colored edge pixels were retained.
- Clipped highlights: Bright reflections on glass or metal disappear along with the background.
- Missing strands: Fine hair and fur are classified as background.
- Internal holes: Mesh, handles, or open spaces become filled instead of remaining transparent.
- Wrong shadows: A useful contact shadow disappears, or an unwanted shadow stays attached.
The right decision is sometimes to skip automatic removal. If the subject depends on reflections, translucency, or a natural shadow, keeping the original scene may preserve more meaning than forcing a transparent result. Otherwise, inspect the mask against the intended replacement background, not only against a checkerboard preview. A defect hidden in a small social thumbnail can become obvious in a product catalog, paid advertisement, or enlarged hero image.
<iframe width="100%" style="aspect-ratio: 16 / 9;" src="https://www.youtube.com/embed/-UzcED-MAks" frameborder="0" allow="autoplay; encrypted-media" allowfullscreen></iframe><a id="best-practices-for-clean-cutouts-on-the-first-try"></a>
Best Practices for Clean Cutouts on the First Try
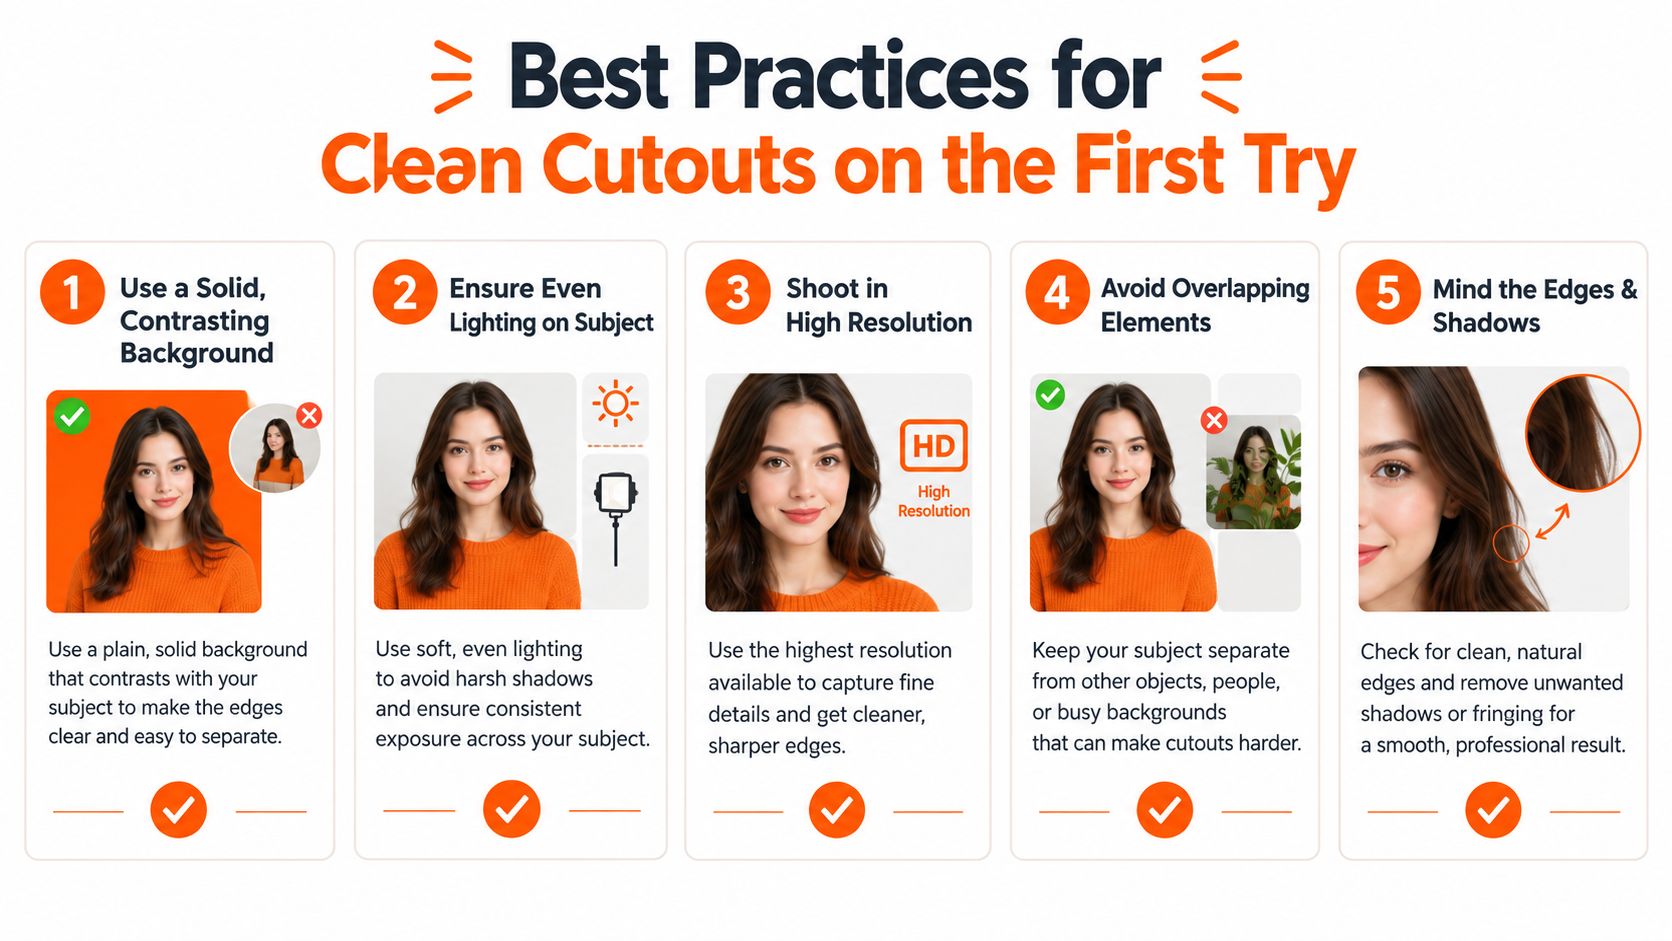
Better input images reduce the amount of correction required later. You don't need a studio cyclorama for every project, but you should make the subject visually legible before asking an AI model to separate it.
<a id="prepare-the-scene-before-uploading"></a>
Prepare the scene before uploading
Start with contrast. A pale product against a medium or dark background gives the model more evidence than a pale product against a pale wall. Keep the background as even as possible, and remove nearby objects that overlap the subject's outline.
Lighting should reveal the boundary without creating a false one. Use broad, even illumination when you can. Watch for bright rims, deep shadows, and color spill from a nearby wall. If the subject casts a useful natural shadow, decide before processing whether you want to retain it as part of the final composition.
Resolution also affects inspection. A small image may hide missing hair strands or rough corners until you place it in a larger design. If an older image is soft, an AI image upscaler workflow can help you prepare a clearer source before testing the cutout, but sharpening can't restore detail that was never captured.
<a id="use-a-repeatable-review-checklist"></a>
Use a repeatable review checklist
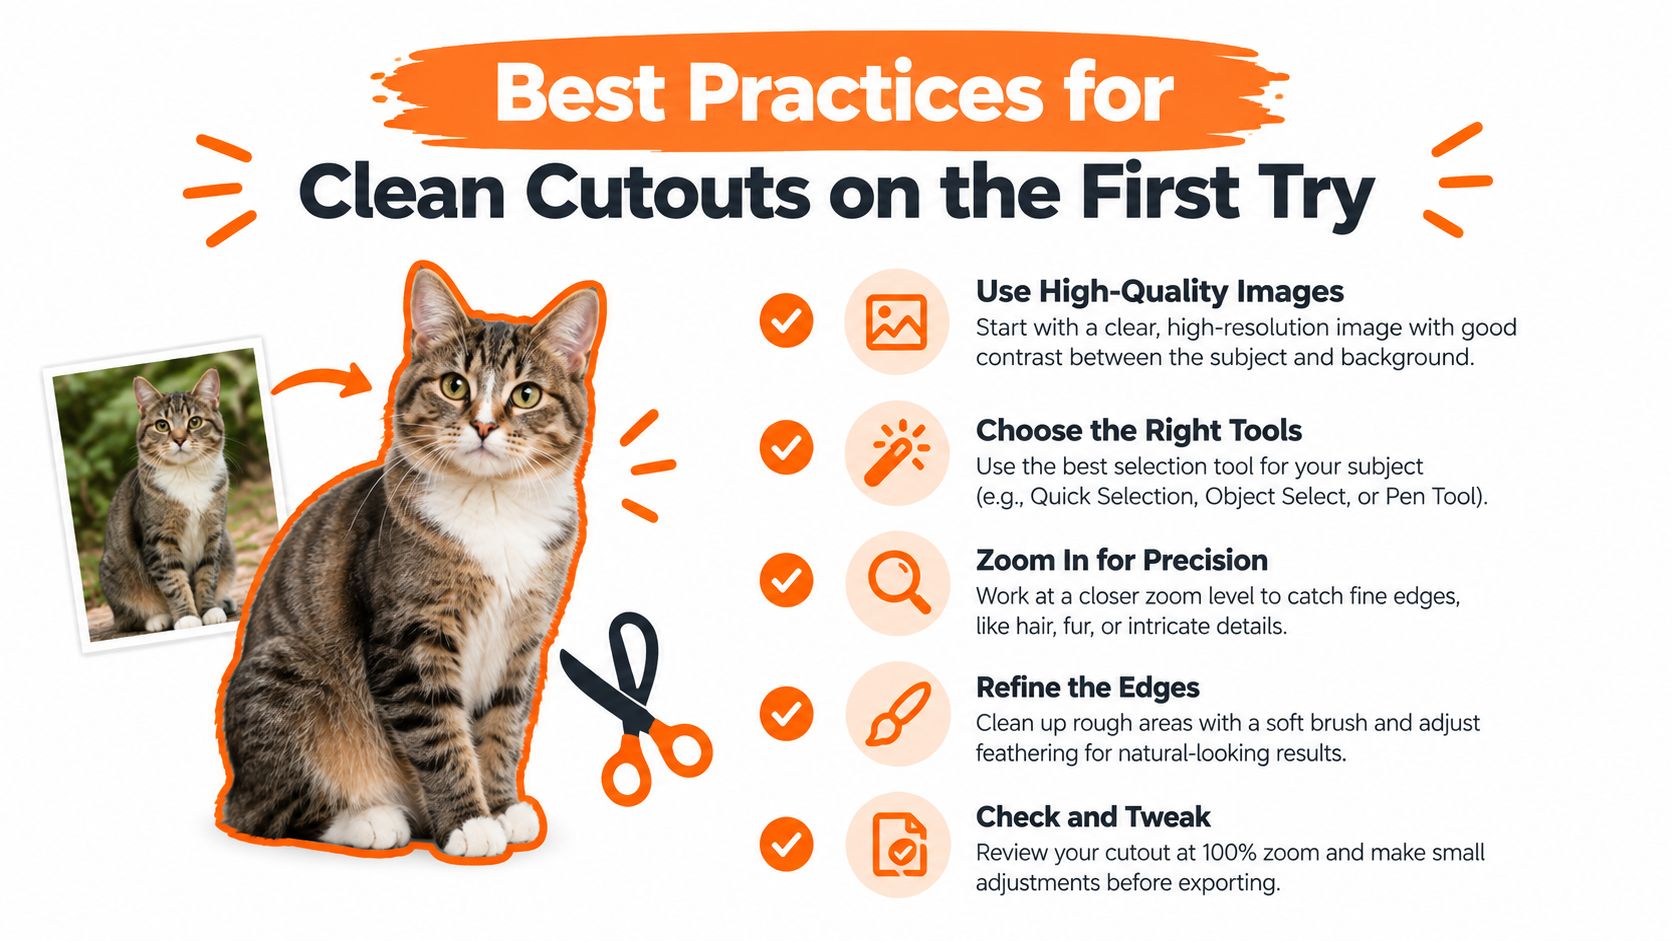
For a single social post, a quick visual check may be enough. For a batch, use the same review sequence every time:
- Inspect the outer contour. Look for halos, stair-step edges, and clipped details.
- Test a contrasting replacement. Place the subject on both a light and dark background.
- Check internal openings. Handles, gaps, mesh, and transparent areas need separate attention.
- Review contact areas. Shoes, product bases, and pet paws often expose leftover shadows.
- Confirm the intended use. A catalog image needs stricter review than a small thumbnail.
Batch preparation deserves its own discipline. Keep source files in a consistent orientation, use predictable filenames, and separate difficult images for manual review rather than allowing them to slow every standard asset.
A useful production habit: Approve a small sample from each visual category before processing the full folder.
For pets and people, inspect fur, hair, whiskers, fingers, and loose clothing. For products, inspect reflective surfaces, labels, handles, and transparent parts. The goal isn't to demand a flawless result from every image. It's to identify which image types need a different method before they enter a high-volume queue.
<a id="file-formats-transparency-and-export-options-explained"></a>
File Formats Transparency and Export Options Explained
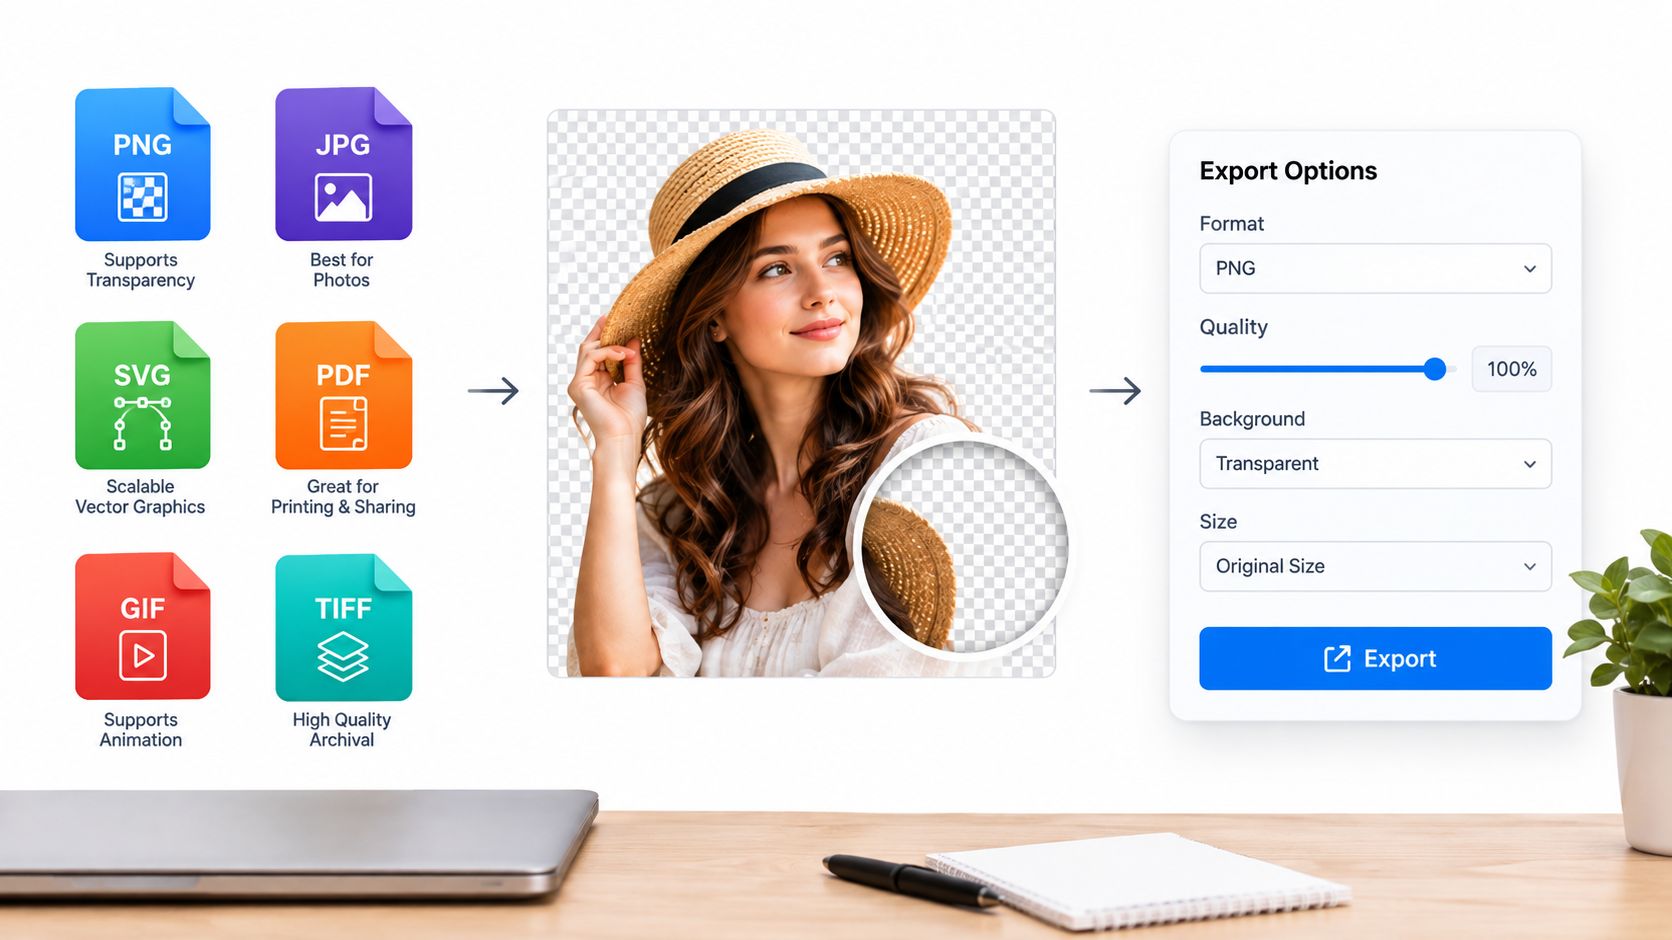
Removing a background only helps if the exported file keeps the separation you just created. Many workflows fail at the last step because someone saves a transparent image as a format that doesn't preserve transparency.
<a id="choose-the-format-by-destination"></a>
Choose the format by destination
| Format | Best use | Main consideration |
|---|---|---|
| PNG | Web graphics, product cutouts, design layouts | Preserves transparency and sharp edges, but files can be larger |
| WebP | Web delivery where supported | Can provide efficient compression, but confirm compatibility with the destination |
| PSD | Layered Photoshop editing and print preparation | Preserves editable structure when the workflow needs more than a flattened cutout |
| Video with alpha | Compositing an isolated subject over motion backgrounds | Requires a codec and editor that support transparency |
| JPG | Final images with a fixed background | Doesn't preserve transparent pixels |
A PNG is a dependable choice when you need a transparent product or person cutout. WebP may suit a website pipeline where browser and platform support are already confirmed. PSD is more appropriate when designers need to continue refining masks, shadows, color, or layers.
<a id="match-export-decisions-to-the-channel"></a>
Match export decisions to the channel
For a marketplace listing, check the platform's accepted formats, dimensions, and background rules before exporting. Some destinations want a solid white background rather than transparency. In that case, place the cutout over the required color and export a flattened file only after reviewing the edges.
For web graphics, keep the transparent master and create delivery versions separately. This gives you a clean source if the design later needs a different background, crop, or aspect ratio. Avoid repeatedly opening and resaving compressed files, especially when the subject has hair or fine texture.
Video requires another decision. A transparent still image can be placed over footage, but moving subjects may require frame-by-frame or sequence-based processing. If you're exporting a person or object for compositing, confirm that the video format retains an alpha channel and that your editing application interprets it correctly.
Aspect ratio also affects placement. A portrait asset designed for 9:16 may need different framing from a square 1:1 post or a 16:9 composition. Keep the subject's scale and safe space in mind rather than cropping the same transparent file three times.
<a id="integrating-background-removal-into-image-and-video-workflows"></a>
Integrating Background Removal Into Image and Video Workflows
A product team preparing a catalog batch may begin with hundreds of photos, yet the work starts after the AI creates its masks. A reliable pipeline moves from source capture and quality checks to subject isolation, edge review, design or compositing, export, and delivery. Automation can handle predictable images, while people inspect files with transparency, reflections, hair, or overlapping objects. The cutout is a matting decision inside a larger production system, not a finished asset by itself.
<a id="batch-processing-needs-governance"></a>
Batch processing needs governance
Mask quality matters, but file handling can determine whether a workflow is usable. Before uploading sensitive product photos, client material, or unpublished creative to a cloud service, check how the tool processes files, which privacy controls it offers, and whether local processing is available. Current tool evaluations consider batch throughput, output formats, privacy mode, and first-try completion rate (workflow comparison). A clean result still creates delays if every image needs manual repair.
Batch support should cover more than uploading. Consistent naming, predictable output locations, supported file types, and a queue for failed or low-confidence results help a team separate routine work from exceptions. A catalog group handling repeatable product photos may accept occasional review. Legal, medical, or brand-sensitive material may require tighter control over storage, access, and approval.
Background removal is a recurring editing task, so repeatability often matters more than a single impressive cutout. Teams should measure how many files pass review, how often edges need correction, and whether the output fits the next application. Those checks reveal the practical value of automation better than a demo image.
<a id="connect-the-cutout-to-the-final-asset"></a>
Connect the cutout to the final asset
Approved transparent files can flow into templates, catalog layouts, advertisements, or product mockups. In short-form video, the isolated subject can sit behind captions, in front of animated graphics, or inside a sequence created by turning pictures into videos. The background is removed only when the new composition benefits from separating subject and scene.
ClipNova combines background removal with image upscaling, voiceover, captions, music, and exports for 9:16, 1:1, and 16:9 formats in one workspace. A creator can prepare an image, develop a short-form concept, add narration and captions, then produce variations without transferring the asset among separate creative applications.
Keep the original image beside the transparent version. An isolated subject can lose spatial clues that another stage needs, including scene information, object boundaries, or environmental cues. Research discussed earlier found that isolated backgrounds may help classification, particularly for simpler models trained from scratch, while background removal did not help instance or semantic segmentation tasks dependent on spatial relationships.
For catalog teams, guidance on save on catalog image editing with MerchLoom frames removal as an operational process. That means defining approval rules, preserving source files, and routing difficult masks for review before they reach the final channel.
<a id="putting-it-all-together-and-choosing-your-next-step"></a>
Putting It All Together and Choosing Your Next Step
Use background removal when the subject needs to move into a new composition, when the original setting distracts from the product, or when a repeated layout requires consistent isolation. Skip it when the scene provides information your audience or model needs, such as spatial relationships, usage context, or object boundaries.
Your decision can follow four questions:
- What is the subject? Solid-edged products are usually easier than hair, fur, glass, mesh, or reflective surfaces.
- What will replace the background? Review the cutout against the actual destination, not only a transparency checkerboard.
- What format does the next tool require? Keep a transparent master when future layouts may change, and use a flattened background only when the channel demands it.
- Who needs to approve the result? A solo creator may review every file, while a team needs batch rules, privacy checks, naming conventions, and an exception queue.
Keep the original source beside the transparent version. Test representative easy and difficult images before processing a complete batch. If the final project involves video compositing, review the principles in this guide to create a background for green screen video before choosing a replacement scene.
The best result isn't always the most aggressive removal. It's the result that preserves the visual information your project needs while reducing unnecessary editing. Apply the technique selectively, inspect the edges at the final display size, and measure success by finished assets rather than by how quickly a button produces a mask.
If you want to turn clean cutouts into publish-ready image and video assets, visit ClipNova to explore background removal alongside upscaling, voiceover, captions, music, and multi-format export. Test the workflow with your own easy and difficult images, then build a repeatable process around the results that hold up in your real production pipeline.
Ready to ship your own?
Start creating viral videos with AI in under twenty minutes, no credit card required.