

You've cleaned the room, recorded a sharp talking-head clip, and uploaded it to an AI background remover. The preview looks perfect until playback starts. Hair flashes against the replacement scene, one shoulder expands and contracts, and a faint green rim follows the subject through every movement.
That's the difference between a convincing still-image cutout and reliable AI video background removal. A video isn't one segmentation task. A 10-second clip at 30 frames per second contains 300 segmentation decisions, and a small inconsistency between those decisions becomes visible as flicker, crawling edges, or a subject that seems to change shape. Verified Market Reports describes temporal consistency as a persistent challenge in video background removal.
Table of Contents
- Why Most AI Background Removers Fail on Real Footage
- Choosing the Right AI Removal Approach
- Step-by-Step AI Background Removal Workflow
- Replacing the Background After the Cutout
- Edge Cases That Still Break AI Models
- Troubleshooting Common Cutout Problems
- Building a Repeatable Background Removal Habit
<a id="why-most-ai-background-removers-fail-on-real-footage"></a>
Why Most AI Background Removers Fail on Real Footage
The first playback usually reveals the problem faster than the preview. On a paused frame, the subject looks isolated. At normal speed, flyaway hair strobes, fingers disappear, and the outline seems to breathe around the shoulders. The model may have produced acceptable masks, but it hasn't necessarily produced a stable sequence of masks.
Many lightweight tools still approach video as a collection of images. They analyze each frame for foreground and background, then move to the next frame with limited awareness of what the subject looked like before. That method works reasonably well for a static presenter against a simple wall. It becomes unreliable when the subject turns, lighting changes, or the background contains similar colors.
<a id="the-three-visible-symptoms"></a>
The three visible symptoms
- Edge flicker appears first around hair, ears, fingertips, and loose clothing. These areas contain fine detail and low-contrast boundaries, so the model may include them in one frame and discard them in the next.
- Identity drift happens when the mask subtly inflates or contracts. The face can remain recognizable while the shoulders, elbows, or product outline shift enough to look artificial.
- Color spill occurs when pixels from the old background contaminate the matte. Green or blue reflections often remain on hair, skin, glasses, and glossy products after the replacement is applied.
The technical standard has improved. A market report says modern transformer and semantic-segmentation methods can reduce false-positive rates to below 2% in standard use cases, while specialized models can reach 94% or higher accuracy on difficult scenes involving motion, hair detail, or backlighting. Those figures describe model performance in defined testing conditions, not a guarantee that every clip will look clean. The market analysis explains the difference between standard and difficult-scene performance.
Practical rule: Judge the matte while the clip plays at normal speed. A clean paused frame is evidence of a good starting point, not a finished shot.
Start your review with the first five seconds. Check hair against a contrasting background, then inspect the hands, glasses, and lower edge of the subject. If the mask jitters there, changing the replacement image won't solve the underlying problem. You need temporal smoothing, a better source clip, manual refinement, or a hybrid workflow.
<a id="choosing-the-right-ai-removal-approach"></a>
Choosing the Right AI Removal Approach
The right tool depends less on the label “AI” than on what you need to do after segmentation. A creator publishing a short vertical clip can tolerate a different workflow from an editor delivering a transparent asset for compositing.
Cloud services are convenient when you want to upload footage, preview the result in a browser, and avoid managing a local graphics card. They suit occasional jobs and teams that need to process longer clips without tying up an edit workstation. The trade-off is control. Upload time, privacy requirements, processing queues, subscription limits, and resolution caps can matter more than the quality of the first preview.
A downloadable desktop engine gives you more control over source media, cache files, export settings, and local review. GPU acceleration can make interactive refinement practical, especially when you need to revisit a difficult shot. It also places the burden on your hardware, storage, software compatibility, and technical setup. A desktop tool that produces a strong matte but takes too long to preview may still slow a busy editor.
An all-in-one studio places removal beside trimming, captions, background replacement, and export. That middle path is useful for short, publish-ready social videos where the final composite matters more than delivering an isolated matte to another post-production application. A platform such as ClipNova is relevant to this broader workflow because its studio combines video creation and editing features, while its image tools include background removal and its video tools support changing the scene behind a person.
<a id="match-the-approach-to-the-job"></a>
Match the approach to the job
Use these questions before choosing:
- How long are the clips? Browser processing is convenient for occasional uploads, while local processing can be more practical when repeated previews would make uploading disruptive.
- What resolution do you need? Confirm the actual input and output limits. A tool that looks good on a compressed preview may not preserve detail at the resolution required for delivery.
- Do you need transparency? An alpha matte gives a compositor flexibility, but it exposes edge defects. A finished composite hides some problems and is faster for direct publishing.
- How difficult is the subject? A centered presenter against a contrasting wall is a simpler job than a dancer, pet, reflective product, or subject moving through changing light.
- What happens after export? If the file goes into After Effects, Motion, or DaVinci Resolve, prioritize alpha support and frame stability. If it goes straight to a social platform, prioritize a correctly sized composite and reliable playback.
| Factor | Cloud SaaS | Desktop Engine | In-Platform Studio |
|---|---|---|---|
| Setup | Browser upload, minimal installation | Requires local software and suitable hardware | Removal sits inside an editing workspace |
| Control | Usually limited to service controls | Stronger control over media and refinement | Practical controls tied to publishing |
| Best fit | Occasional processing and remote teams | Repeated jobs and downstream compositing | Short social clips and fast composites |
| Main trade-off | Upload time, limits, and subscription dependence | Hardware, storage, and maintenance | Less specialized control than a dedicated compositor |
| Output priority | Preview and downloadable result | Alpha, sequence, or high-control export | Publish-ready video |
The category itself is still expanding rather than mature. One market report estimates $1.42 billion in 2024 and projects $7.12 billion by 2033, with a reported 18.9% CAGR. That market estimate also discusses the relationship between adoption and improving subject-detection quality. Treat market growth as context, not as proof that every tool handles real footage equally well.
<a id="step-by-step-ai-background-removal-workflow"></a>
Step-by-Step AI Background Removal Workflow
A dependable job starts before you touch the background replacement panel. Duplicate the source clip, confirm its frame rate and resolution, and watch a short section where the subject moves through the most difficult part of the shot. Don't judge the tool on an easy opening pose.

<a id="start-with-automatic-detection"></a>
Start with automatic detection
Drop the clip into the editor and use the auto-detect subject button. Select the person, product, pet, or logo you want to preserve, then preview the mask over the full movement range. Don't refine every edge immediately. First determine whether the system keeps the same subject selected as the shot develops.
Look for failures at transitions, turns, and points where the subject overlaps a similar-toned background. If the mask loses a hand or includes a nearby object, use the refine-edge brush to add or remove the affected area. Work in short passes. Broad strokes can fix one frame while damaging the edge across the rest of the clip.
<a id="stabilize-the-sequence"></a>
Stabilize the sequence
Enable the temporal smoothing or stabilization toggle if the editor provides one. This setting is designed to reduce frame-to-frame changes, but it can also make a fast-moving subject feel slightly delayed or soften fine detail. Review hair, fingers, and motion-blurred edges after enabling it, because stability and sharpness can pull in opposite directions.
Research on real-time portrait segmentation found that spatial-temporal refinement was specifically added to reduce frame-level errors and preserve coherence. The reported system reached more than 70 frames per second on 720p video on an Nvidia Titan X, and the work used a 50-sequence portrait dataset for fine-tuning. The original technical paper explains why temporal refinement and video-specific data matter.
If you're also preparing still assets from the same shoot, a separate guide to edit photos with AI assistants can help you keep image and video cutouts visually consistent. Don't assume an image workflow will solve motion problems, though. Video needs a stable matte over time.
<a id="replace-and-inspect"></a>
Replace and inspect
Open the background replacement panel only after the subject mask holds during playback. Test a plain contrasting color first. A busy stock video can hide a defect during one moment and reveal it in the next. Once the edge is stable, choose an image or video plate and use the color-match slider to bring the foreground and background closer in exposure and temperature.
Play the composite at 1x speed, not only in a fast editor preview. Watch the first movement, the most extreme gesture, and the final frame before committing to a full render.
<iframe width="100%" style="aspect-ratio: 16 / 9;" src="https://www.youtube.com/embed/Odg-RHQOUoo" frameborder="0" allow="autoplay; encrypted-media" allowfullscreen></iframe><a id="choose-the-correct-export"></a>
Choose the correct export
Select an alpha matte when another editor will handle the composite. For downstream work, a ProRes file or PNG sequence preserves the separation in a form that compositing software can use. Choose H.264 when you're exporting a finished composite for direct publishing and don't need a transparent layer.
Before rendering the full timeline, export a short test section and inspect it on the intended background. This catches alpha interpretation, edge-premultiplication, frame-rate, and color-management problems while they're still cheap to fix.
<a id="replacing-the-background-after-the-cutout"></a>
Replacing the Background After the Cutout
A cutout only works once it sits in a background that matches the shot. Light direction, contrast, depth, and motion all have to agree. If they do not, viewers spot the composite even when the matte itself looks clean.
Start by deciding whether the replacement should be an image, a video plate, or a softer treatment like blur. Image and video backgrounds give the most control for branded explainers, product demos, and creator clips that need a specific setting. Match the plate's resolution and frame rate to the source, then compare the subject's key light with the brightest part of the new background. A warm face can sit in a cool scene, but an uncorrected mismatch often looks pasted on. For this background guide for green-screen video, you can learn how to select and prepare a replacement plate before applying it to your cutout.
A transparent matte makes sense when the shot needs more work later. It is the right handoff for a later compositor or for a version that may need several layouts. The trade-off is that every edge flaw stays exposed, including hair halos, missing translucent detail, and dirty spill along the boundary. If the segmentation still wobbles from frame to frame, the matte will show it immediately.
Blur is the fastest practical choice for talking heads and simple product demos. It hides minor edge defects and keeps attention on the speaker. Heavy blur, though, can make the clip feel like a generic webcam shot. Use it when you care more about separation than about building a fully designed environment.
| Replacement Type | Best Use Case | Edge Quality Required | Export Format |
|---|---|---|---|
| New image or video | Brand storytelling, ads, product demos | Clean edges plus believable color and light | H.264 for a finished composite |
| Transparent matte | Further compositing and layout variants | Very high, because the matte remains exposed | ProRes or PNG sequence |
| Blur | Talking heads and quick presentations | Moderate, with no distracting halo | H.264 for direct publishing |
Check for chroma spill before export. Green or blue contamination can stand out more against a neutral replacement than it did against the original scene. For social formats, practical guidance on green screen editing for TikTok can help with platform-oriented compositions.
<a id="edge-cases-that-still-break-ai-models"></a>
Edge Cases That Still Break AI Models
The claim that AI removes any background sounds attractive in a demo. Real footage is less cooperative. The model needs a defensible boundary, and several common subjects either don't have one or change too quickly for the mask to follow.
Flyaway hair against a busy background often turns into a soft, crawling halo. The individual strands may merge into the backdrop, then reappear when the head moves. Eyeglasses create a different problem. Transparent lenses and reflections can make the model classify the background visible through the glass as part of the subject, or classify the lens itself as background.
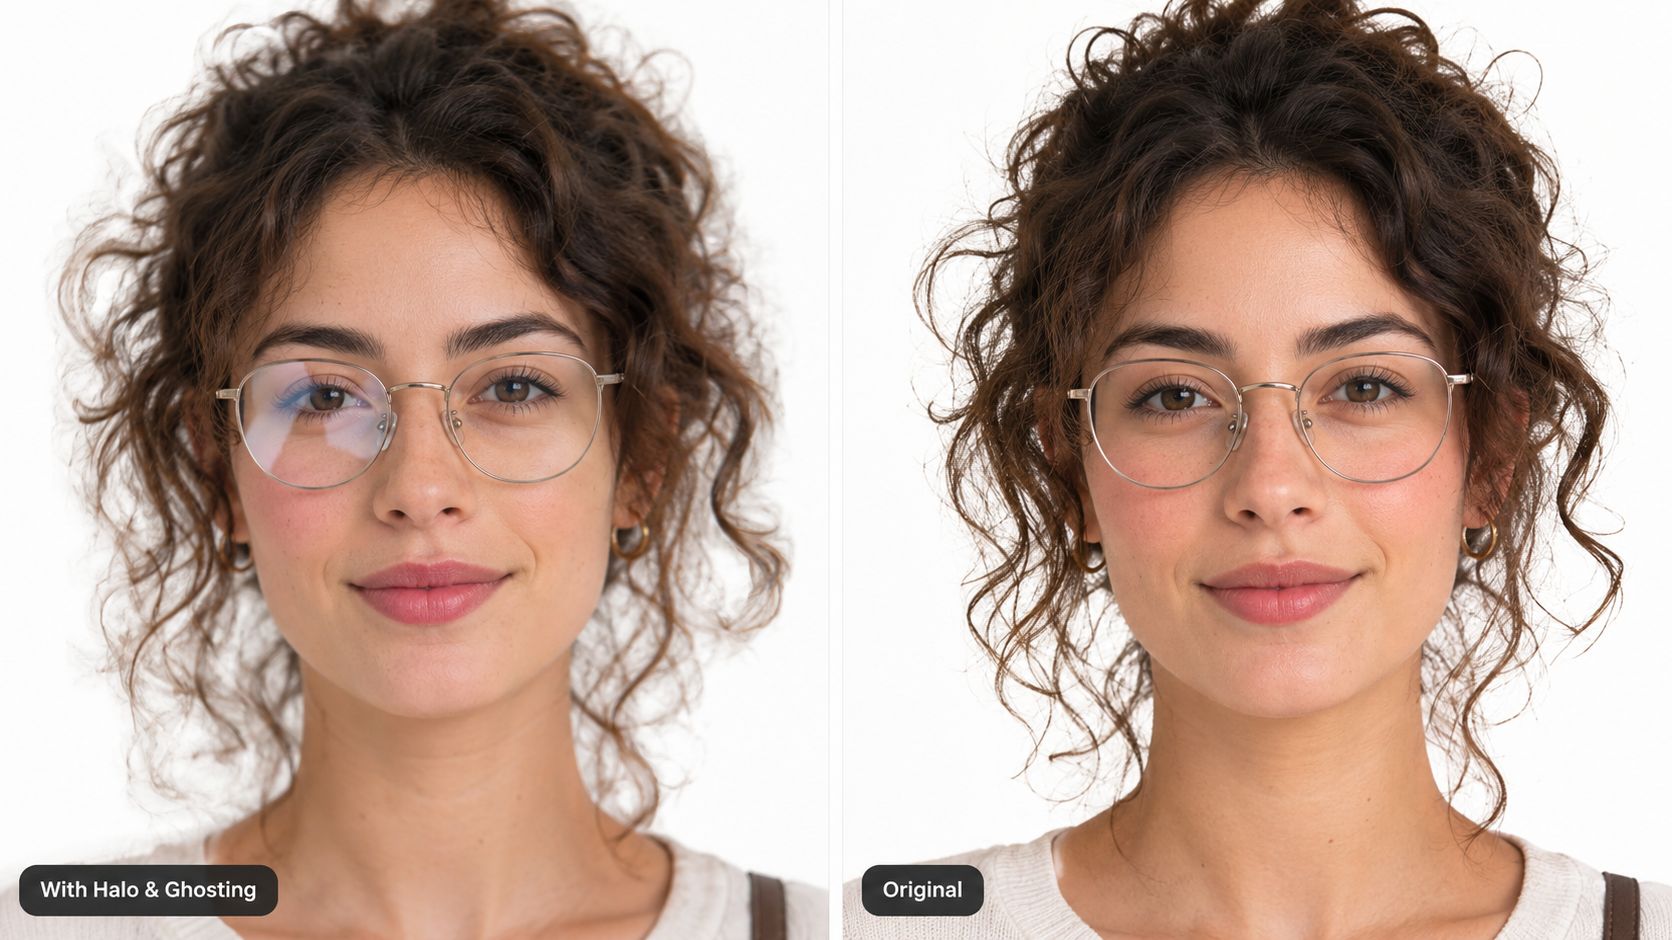
Smoke, steam, and mist don't have a clean perimeter. Expect the mask to pulse, vanish, or become an opaque shape as the subject moves. Fast motion blur removes the edge contrast the model relies on, so a swinging arm or quickly turning head can leave a transparent gap or a blocky silhouette.
<a id="watch-for-underrepresented-shapes"></a>
Watch for underrepresented shapes
Similar-toned clothing and backgrounds are another reliable stress test. A dark shirt against a dark wall can lose the shoulders, while a light sleeve against a bright window may acquire a rough outline. Accessibility devices and mobility equipment deserve deliberate inspection too. Wheelchairs, service animals, and other devices can be partially masked when the model has less familiarity with their shapes or treats them as part of the background.
Run a short playback test with a contrasting background before approving a tool for a larger batch. The symptom usually appears quickly:
- Hair: smeared halo or intermittent strands.
- Glasses: ghosting, filled lenses, or background fragments inside the frame.
- Smoke and steam: pulsing opacity or a hard-edged blob.
- Motion blur: missing limbs or a rectangular patch around movement.
- Similar colors: swallowed clothing edges or holes through the torso.
- Mobility aids and service animals: missing wheels, limbs, harnesses, or connected parts.
For a separate perspective on detecting AI-generated video backgrounds, focus on consistency across the entire scene rather than judging one attractive frame. That same discipline helps editors catch synthetic-looking composites before publication.
<a id="troubleshooting-common-cutout-problems"></a>
Troubleshooting Common Cutout Problems
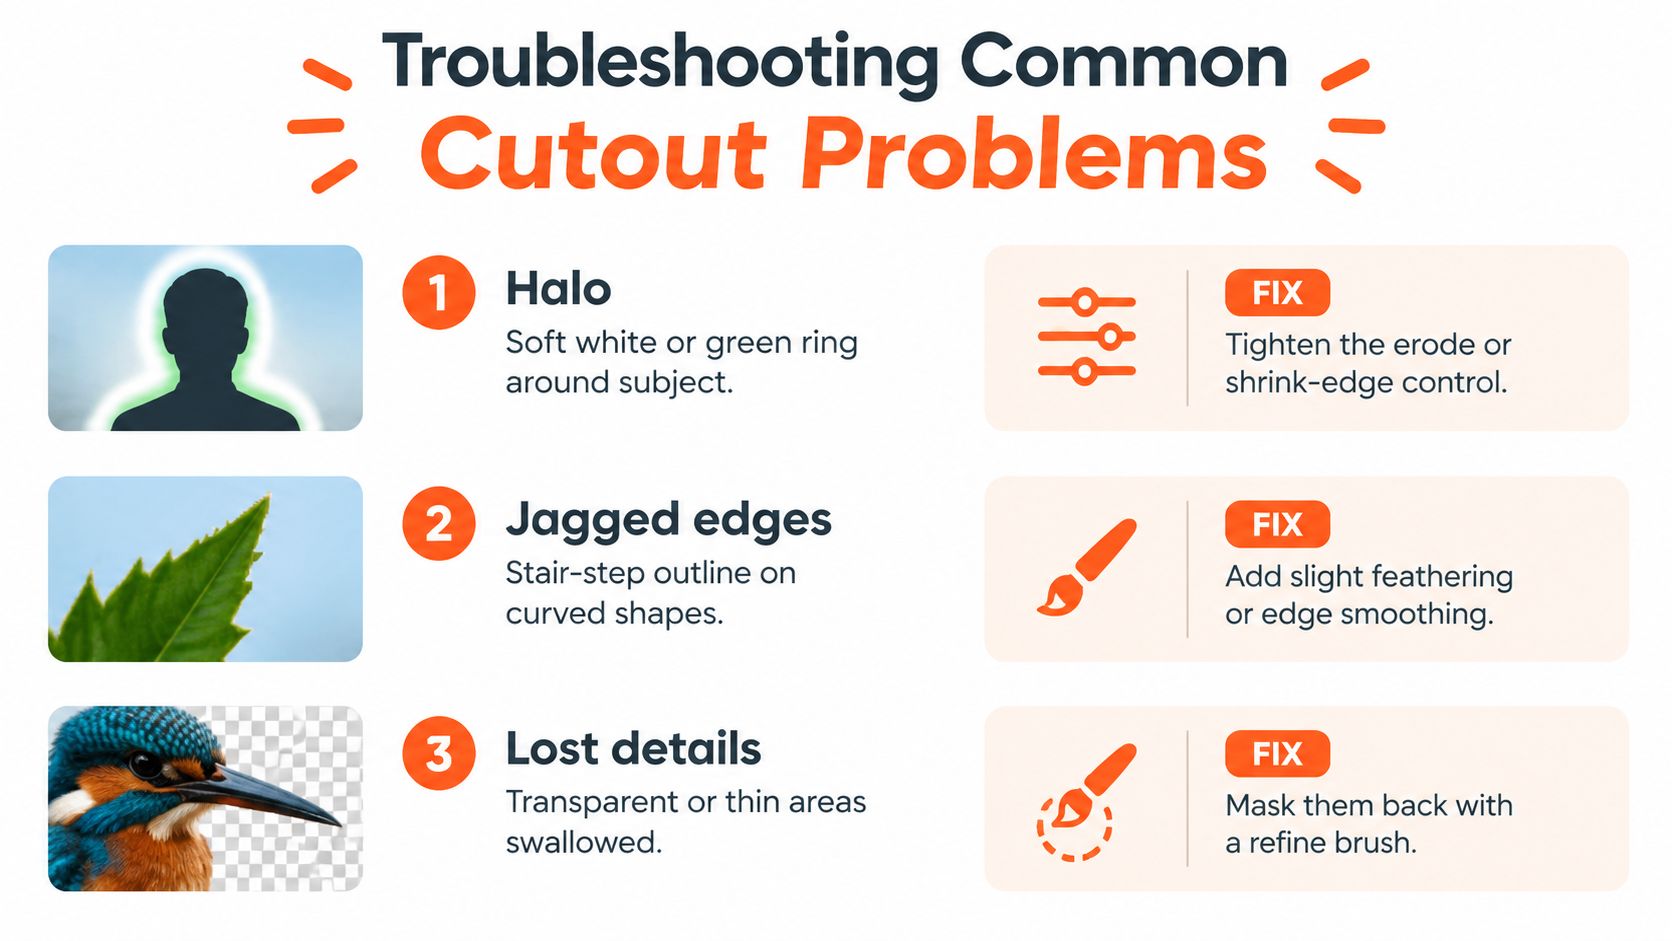
Most failed composites fall into a small set of visible symptoms. Stop the render, identify the defect, and change one control first. Changing several settings at once makes it harder to tell whether the fix worked or only moved the artifact somewhere else.
<a id="halo"></a>
Halo
A soft white or green ring usually means the matte includes contaminated edge pixels or has expanded beyond the true subject boundary. Tighten the erode or shrink-edge control first. If an automatic refinement feature oversharpens the outline, disable it and compare the result at normal playback.
Verify the alpha interpretation or premultiplication setting before rendering the full sequence. A correctly shaped matte can still display a bright rim if the export and receiving editor interpret edge pixels differently.
<a id="flicker"></a>
Flicker
A mask that jitters around hair, hands, or shoulders needs temporal treatment before further styling. Enable temporal smoothing, then lock exposure in the source or grade where possible. Avoid testing the result only against a background with similar colors, because that can hide the exact changes you need to see.
Render a short test with the same frame rate and codec planned for delivery. If the edge moves at 1x playback, don't ship the shot because a paused frame looks clean.
<a id="color-spill"></a>
Color spill
A green or blue cast on skin and hair usually comes from the original lighting rather than a missing section of the mask. Apply a desaturate pass to the spill channel, then adjust the foreground grade so it matches the new backdrop. A subtle correction is safer than aggressively neutralizing every colored pixel, which can make hair and skin look gray.
Check the replacement plate before judging the correction. A background with a strong color cast may make a correctly balanced foreground appear wrong.
Keep a known-good reference clip in the project library. When a new model update or export preset changes the result, comparing the same hair, glasses, and shoulder movements gives you a faster diagnosis than relying on memory.
<a id="building-a-repeatable-background-removal-habit"></a>
Building a Repeatable Background Removal Habit
A clean first frame proves very little. At 30 fps, a 10-second clip gives the model 300 segmentation decisions, and a cutout that looks excellent in one paused frame can still shimmer, crawl, or change shape during playback. Reliable results come from a short quality loop, from checking the source clip through recording the export settings, so every project improves the next one.
<a id="the-five-pass-loop"></a>
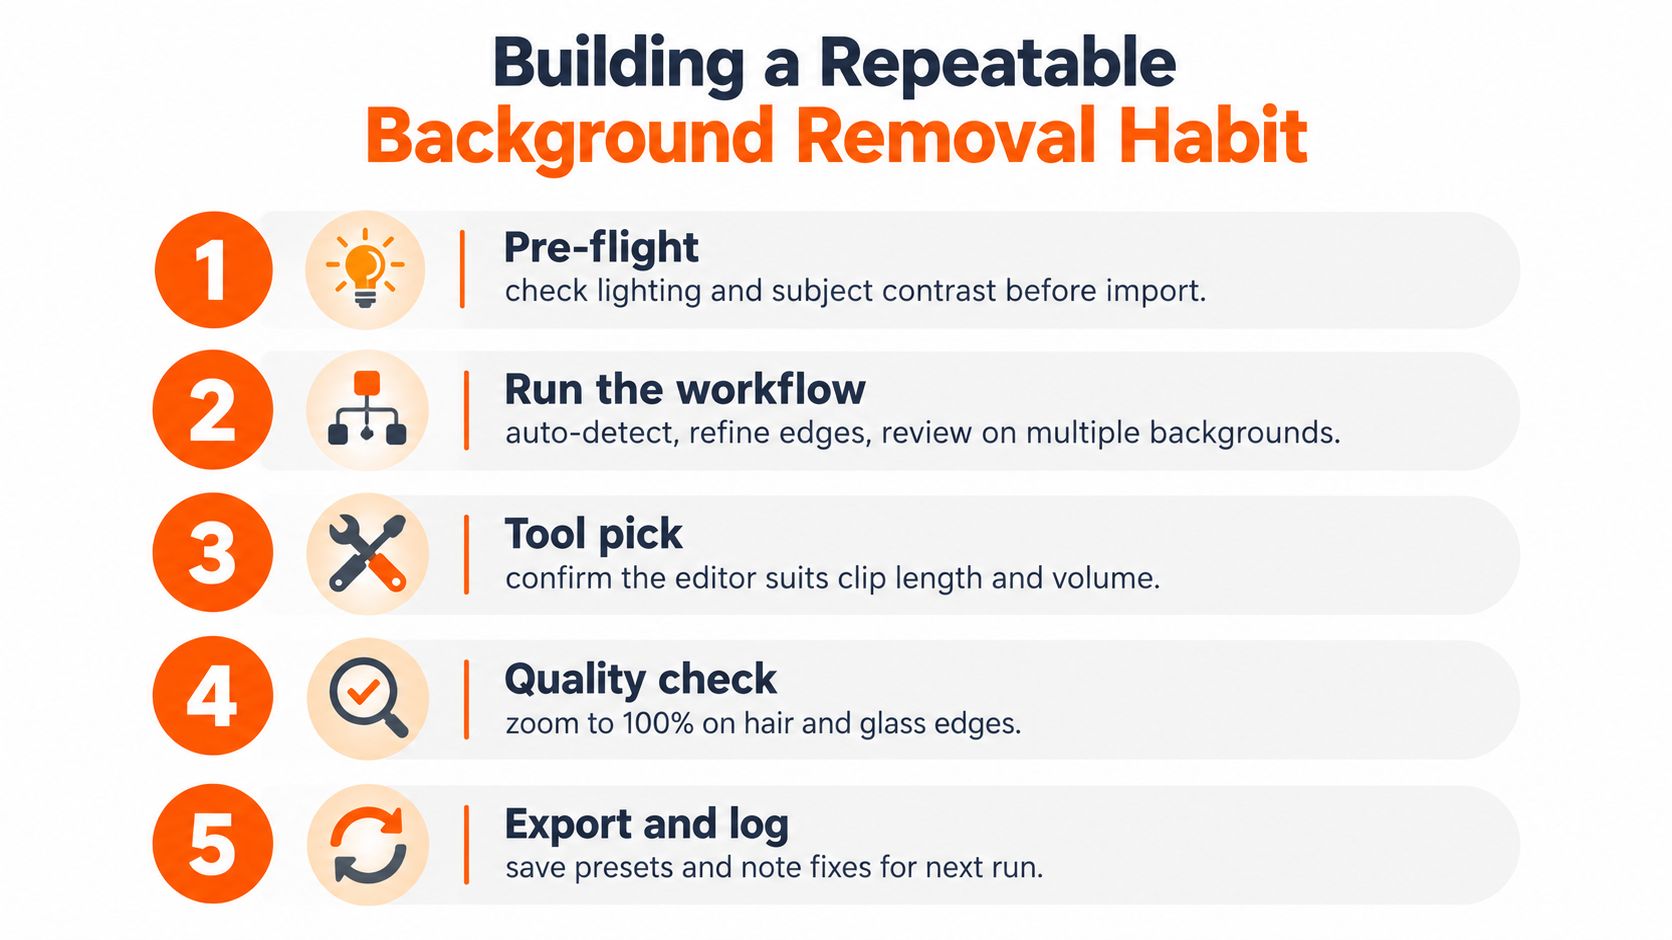
The five-pass loop
- Pre-flight: Check lighting and subject contrast before import. Flag backlighting, similar-toned clothing, reflective surfaces, and motion blur. These conditions often create unstable masks before any refinement begins.
- Ingest: Confirm the source resolution, codec, and frame rate. Keep a clean duplicate so an aggressive refinement pass never damages the original.
- Cutout: Match the workflow to subject complexity and delivery needs. A simple presenter may suit an in-platform editor, while difficult transparent assets may require desktop compositing.
- Refine: Watch the edge at normal speed, then inspect hair, glasses, hands, and translucent details at full size. Review halo, frame-to-frame movement, and spill as separate problems.
- Export and log: Save the tested preset, record manual corrections, and note whether the result is an alpha matte or finished composite.
The value is repeatability. A pre-flight scan identifies weak candidates before refinement consumes time. A fixed review order also prevents a halo or unstable edge from being discovered after the background, captions, music, and grade are complete.
Before replacing the cutout, consult this background guide for green-screen video to prepare a replacement plate that matches the original lighting. For repeated social variants, automate video editing around the cutout, while keeping the final frame-by-frame quality check with the editor.
Keep a small cheat sheet beside the edit bay:
- Tool matrix: cloud for convenience, desktop for control, in-platform editing for fast publishing.
- Default export: alpha for compositing, H.264 for a finished delivery file.
- Re-run triggers: visible halo, frame-to-frame flicker, or persistent color spill.
- Reference check: compare the same known-good clip whenever a model, preset, or export path changes.
AI Video Background Removal saves real labor when footage gives the model a clear subject and enough continuity to follow it. The editor still decides whether the edge survives motion, whether the replacement lighting makes sense, and whether the export holds up beyond a single impressive frame.
ClipNova combines background changes and short-form video creation in one editing workflow. You can test a subject cutout, apply a replacement scene, add captions, and prepare a publish-ready format without rebuilding the project elsewhere. Test it first on a difficult reference clip, then visit ClipNova to assess its fit for your background-removal pipeline.
Ready to ship your own?
Start creating viral videos with AI in under twenty minutes, no credit card required.