
You've exported the video, uploaded the auto-transcript, and expected the hard part to be over. Then you notice the founder's name is wrong, a product term changes spelling between captions, and a key number doesn't match the audio. At that point, adding subtitles isn't a one-click task. It's a short production workflow involving transcription, verification, styling, export, and device testing.
That distinction matters because captions are now a mainstream viewing preference, not only an accessibility feature. A 2026 survey cited by TestParty's media accessibility report found that 79% of UK viewers use subtitles at least sometimes, while 80% of respondents across five countries said they do so at least sometimes. Yet the same report found that only 28% of web videos met its accuracy standard, leaving many videos with missing, flawed, or insufficiently reviewed captions.
Table of Contents
- The Subtitle Workflow Most Creators Skip
- Generate and Edit the Transcript Until It Is Accurate
- Burn-In Captions Versus Sidecar SRT and VTT Files
- Styling Subtitles for Maximum Readability
- Localizing Captions for Multiple Languages at Once
- Pre-Publish Checks That Prevent Embarrassing Captions
<a id="the-subtitle-workflow-most-creators-skip"></a>
The Subtitle Workflow Most Creators Skip
It's 11 p.m. You're looking at a transcript that was supposed to save time. The CEO's name has become something unrecognizable, a customer figure is wrong, and the product codename appears in three different forms across the same video. The generator finished its job, but the video still isn't ready to publish.
That's where many projects stall. Creators treat captions as a final decoration rather than a production stage with its own quality loop. The practical process is straightforward:
- Transcribe the audio with a model suited to the language, speakers, and recording conditions.
- Verify high-risk content, especially proper names, numbers, jargon, and speaker changes.
- Style the text for the screen and platform where viewers will watch.
- Export the correct format, either captions rendered into the video or a selectable SRT or VTT track.
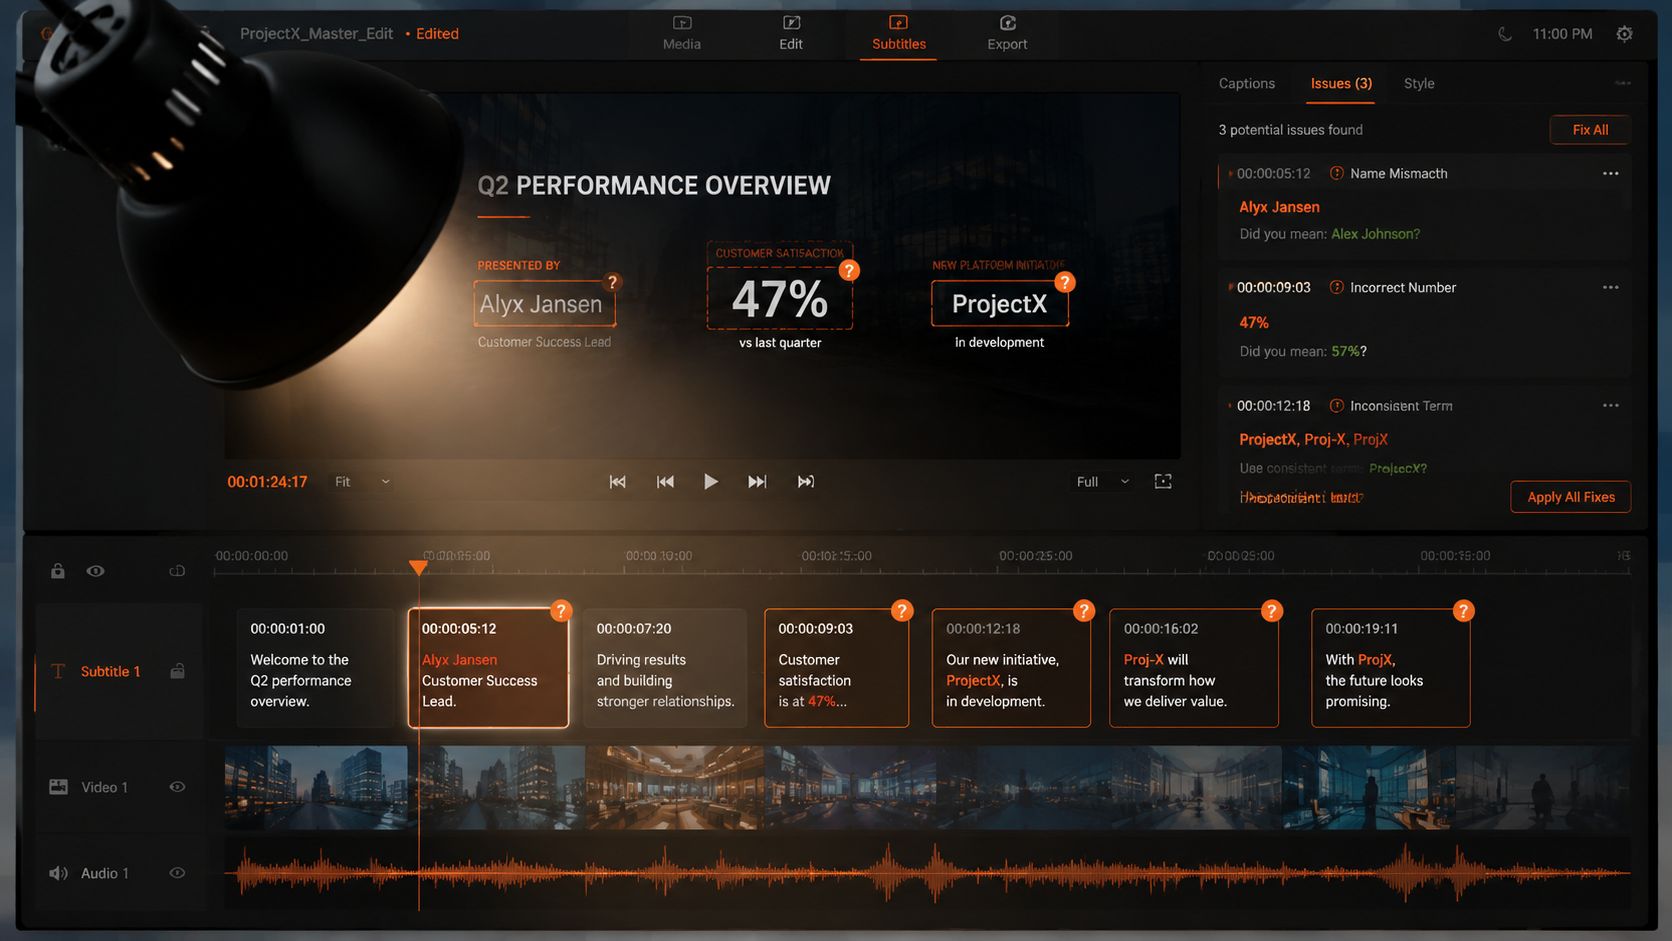
The verify-and-fix stage makes the largest difference to perceived quality. Automatic speech recognition can be useful, but its output varies with background noise, microphone quality, accents, overlapping speakers, and specialist vocabulary. Published research reports automatic speech recognition accuracy commonly ranging from 60% to 90%, depending on the recording environment and evaluation method, while one study measured automated subtitles at 68.88% accuracy in its sample. These findings are summarized in research on automatic subtitle accuracy.
A dashboard's accuracy label doesn't tell you whether a brand name is spelled correctly or whether a sentence break changes the meaning. Viewers see the final caption, not the model's confidence score.
Production rule: Treat the first transcript as an editable draft, never as the final subtitle file.
The technology behind modern subtitle workflows has a long broadcast history. The National Captioning Institute's closed-captioning history records early experiments by the National Bureau of Standards and ABC in 1970, a public demonstration in 1971, the FCC's reservation of line 21 in 1976, the National Captioning Institute's creation in 1979, and the first regularly scheduled closed-captioned television program on March 16, 1980. Modern subtitle systems still depend on the same basic principles, synchronized text, a usable text track, and playback support.
For a solo creator, the full loop can fit into an afternoon. The mistake is assuming generation ends the job. Resources such as automated video production workflows are useful for reducing repetitive assembly, but the final review still needs a deliberate human pass.
<a id="generate-and-edit-the-transcript-until-it-is-accurate"></a>
Generate and Edit the Transcript Until It Is Accurate
Transcription and editing should be treated as one continuous loop. Generate a first pass, review the text against the audio, correct the transcript, then adjust timing and line breaks. Separating those tasks too rigidly often means the editor fixes spelling but misses a cue that enters late or disappears before the speaker finishes.
<a id="start-with-the-audio-not-the-export-format"></a>
Start with the audio, not the export format
Choose a captioning model that matches the recording. A clean, single-speaker recording can work well with a standard same-language caption model. Two speakers, interviews, panels, or videos with interruptions need speaker-aware handling. If the editor supports custom vocabulary, load brand names, product terms, acronyms, and industry jargon before transcription.
That vocabulary pass prevents predictable phonetic guesses. It's especially important for names that the model has no reason to recognize from sound alone.
<a id="use-a-fixed-verification-pass"></a>
Use a fixed verification pass
Review the transcript in a predictable order:
- Names and brands: Match the approved spelling exactly, including capitalization.
- Numbers and units: Check every figure, date, measurement, currency reference, and abbreviation against the audio or source material.
- Technical vocabulary: Compare specialist terms with a glossary rather than relying on pronunciation.
- Punctuation: Restore commas, question marks, and sentence breaks where they change meaning.
- Readable phrasing: Remove unnecessary filler from the displayed caption when it doesn't help comprehension, while preserving the speaker's meaning.
- Speaker identity: Confirm that dialogue is assigned to the right person and that speaker labels are consistent.
Use a two-screen layout if possible. Keep the transcript or subtitle editor on one side and the video waveform or player on the other. Scrub through groups of cues instead of correcting each word in isolation. A cue that starts too early can make the previous speaker appear to say the next line, while a late cue forces viewers to read after the thought has already moved on.
A final read-aloud check at normal playback speed catches problems that silent proofreading misses. If the spoken phrase and the displayed line feel out of sync when you hear them together, the viewer will notice too.
<a id="set-the-target-before-you-edit"></a>
Set the target before you edit
The target depends on what the video is doing. An informal social clip can use concise readable phrasing, while a legal, medical, educational, or product demonstration video needs closer fidelity.
| Content Type | Target Accuracy | Priority Checks |
|---|---|---|
| Social short-form clip | Clean, faithful meaning | Hook wording, names, numbers, readable timing |
| Interview or podcast | Faithful dialogue and speakers | Speaker changes, interruptions, proper nouns |
| Training or educational video | High transcript fidelity | Technical terms, definitions, punctuation |
| Product or sales video | Exact commercial language | Product names, claims, prices, calls to action |
Automatic systems can produce strong drafts, but edited captions can improve substantially. One cited benchmark found accuracy could reach at least 98% when transcripts were edited and the system was trained on speaker voice data, as reported in the same automatic subtitle accuracy research. For a practical starting point, a caption generator for video can handle the initial transcription, but you should still inspect the output before publishing.
<a id="burn-in-captions-versus-sidecar-srt-and-vtt-files"></a>
Burn-In Captions Versus Sidecar SRT and VTT Files
The burn-in versus sidecar decision is a publishing decision, not a formatting preference. Burn-in captions become part of the video image. Sidecar captions remain a separate text file that the player displays when the viewer enables them.
<a id="burn-in-captions"></a>
Burn-in captions
Burn-ins work well when the video must communicate without relying on player controls. Short-form feeds often autoplay, so a TikTok, Instagram Reel, or YouTube Short can lose its spoken message if the text isn't visible in the exported pixels.
A 30-second TikTok hook is a clear example. Render the captions into the MP4, keep them inside the vertical safe area, and preview the result on a phone. The captions will remain visible even if the platform changes its caption controls or the viewer watches through a repost.
The trade-off is permanence. Viewers can't switch languages, turn the text off, or adjust its appearance. You also shouldn't hardcode captions into a master video that you expect to localize later.
<a id="sidecar-srt-and-vtt-files"></a>
Sidecar SRT and VTT files
SRT and WebVTT files keep the words separate from the video. YouTube long-form videos, Vimeo, Udemy, and many learning management systems can display these tracks through a caption control. The viewer can choose whether to show them, and platforms can support multiple language tracks without requiring a new video export for every language.
For a 12-minute YouTube tutorial, export an SRT or VTT file and add a polished manual transcript where the platform supports it. That approach keeps captions selectable, makes localization easier, and gives viewers control over the viewing experience.
For a corporate training upload, VTT is often the safer default when the LMS specifically requests it. Always check the platform's accepted format before delivery. Some systems reject duplicate timing signatures, malformed cues, or unsupported styling.
| Format | Best For | Pros | Cons |
|---|---|---|---|
| Burn-in MP4 | Social feeds and silent autoplay | Travels with the video, always visible | No language toggle, no off switch, permanent errors |
| SRT | YouTube, archives, broad compatibility | Simple, editable, easy to localize | Styling support is limited and platform-dependent |
| VTT | Web players, Vimeo, LMS platforms | Designed for browser playback and selectable tracks | Requires correct formatting and player support |
Delivering both can make sense. Keep a clean burned-in social master and a reviewed SRT or VTT file for platforms that support selectable captions. For a broader comparison of live transcription and captioning options, this iScribe Live Transcribe review provides useful context around tool capabilities and limitations.
<a id="styling-subtitles-for-maximum-readability"></a>
Styling Subtitles for Maximum Readability
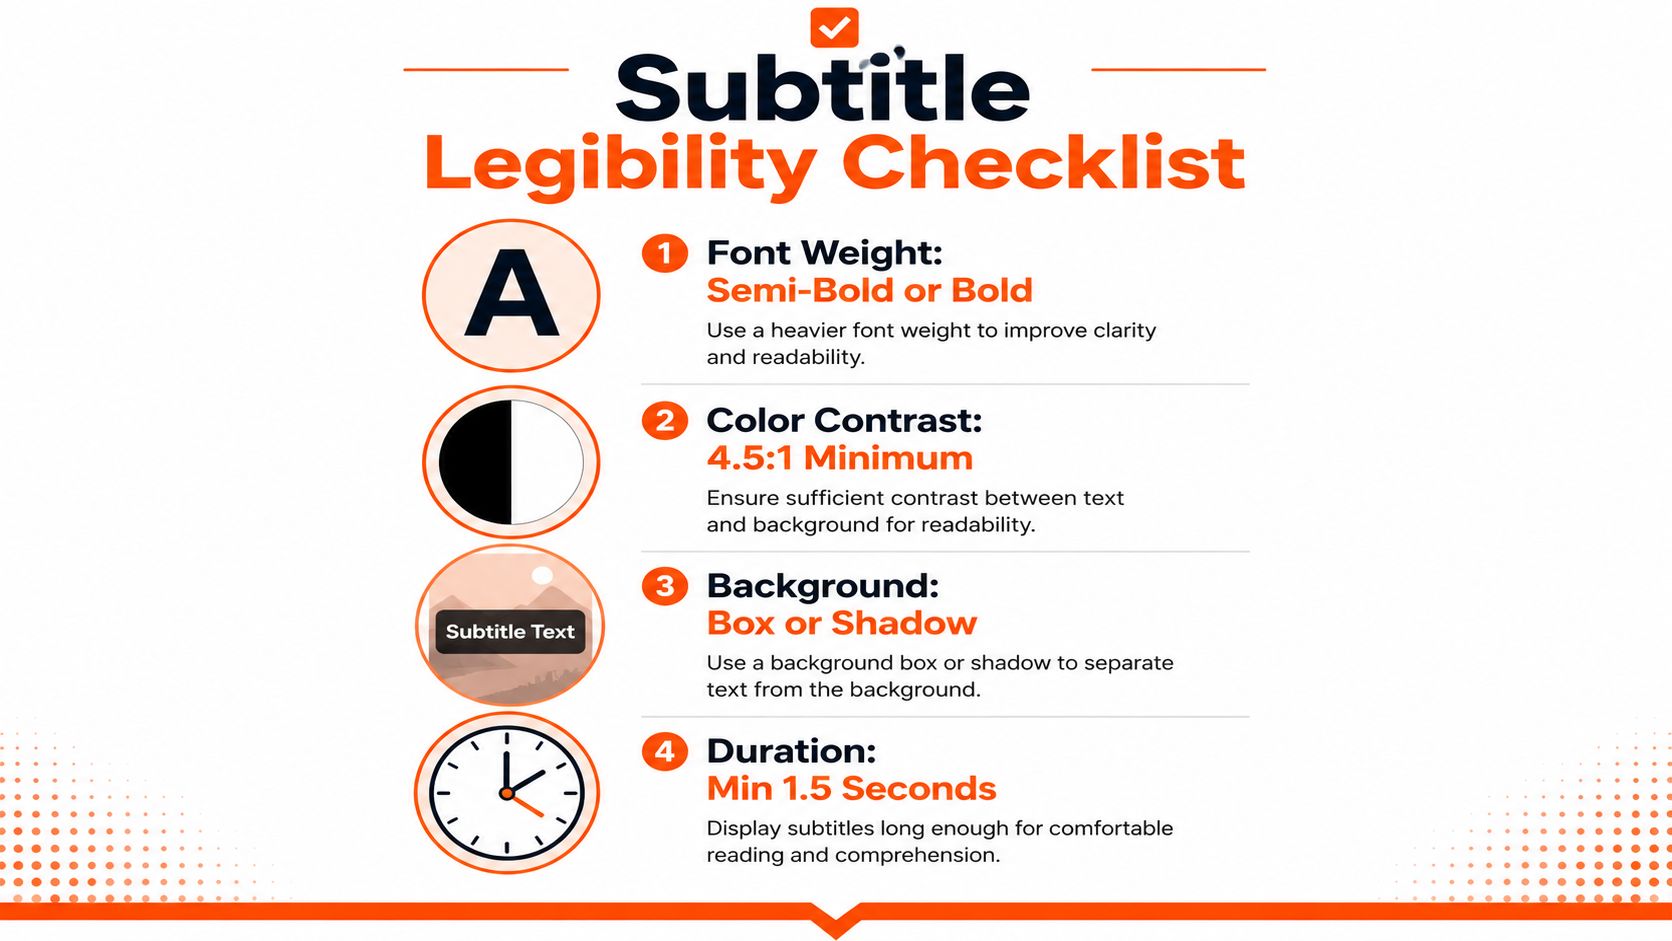
A technically accurate caption can still fail on a busy frame or a small phone screen. Legibility should drive the design, while branding stays within those readability limits. Use these settings as a practical baseline:
- Font weight: Choose a semi-bold or bold sans-serif rather than a thin typeface.
- Contrast: White text with a dark outline or shadow holds up across changing backgrounds better than unprotected text.
- Placement: Keep captions in the lower safe zone, then move them when they cover faces, product details, diagrams, or existing on-screen text.
- Line length: Use no more than two lines and break at natural phrase boundaries.
- Backing treatment: Add a high-contrast box when the footage is busy or bright behind the text.
- Mobile preview: Review the video on a small phone at reduced brightness. If the words are slow to read there, desktop playback will not fix the problem.
Safe zones need to account for the final delivery format. A position that works in a 16:9 edit can be cropped or covered after reformatting for a vertical feed. Keep clear margins from the frame edges, and create separate positioning presets for square and vertical exports.
Line breaks affect reading speed. A clean two-line split is easier to scan than one that separates a noun from its verb. Avoid forcing every spoken word into a dense block. Viewers need time to read while following the action, so remove unnecessary repetitions and leave enough duration for each cue.
Mobile test: If the subtitle styling fails on a small screen, reduce visual complexity before reducing the viewer's reading comfort.
Caption timing also depends on the audiovisual edit. Replacing dialogue, dubbing a translated version, or matching new voiceover to existing footage can shift the point at which text should appear. A lipsync tool from Synchronicity Labs Inc. may help align the spoken performance before the caption track is finalized.
<iframe width="100%" style="aspect-ratio: 16 / 9;" src="https://www.youtube.com/embed/5Y3Em-IMSwM" frameborder="0" allow="autoplay; encrypted-media" allowfullscreen></iframe><a id="localizing-captions-for-multiple-languages-at-once"></a>
Localizing Captions for Multiple Languages at Once
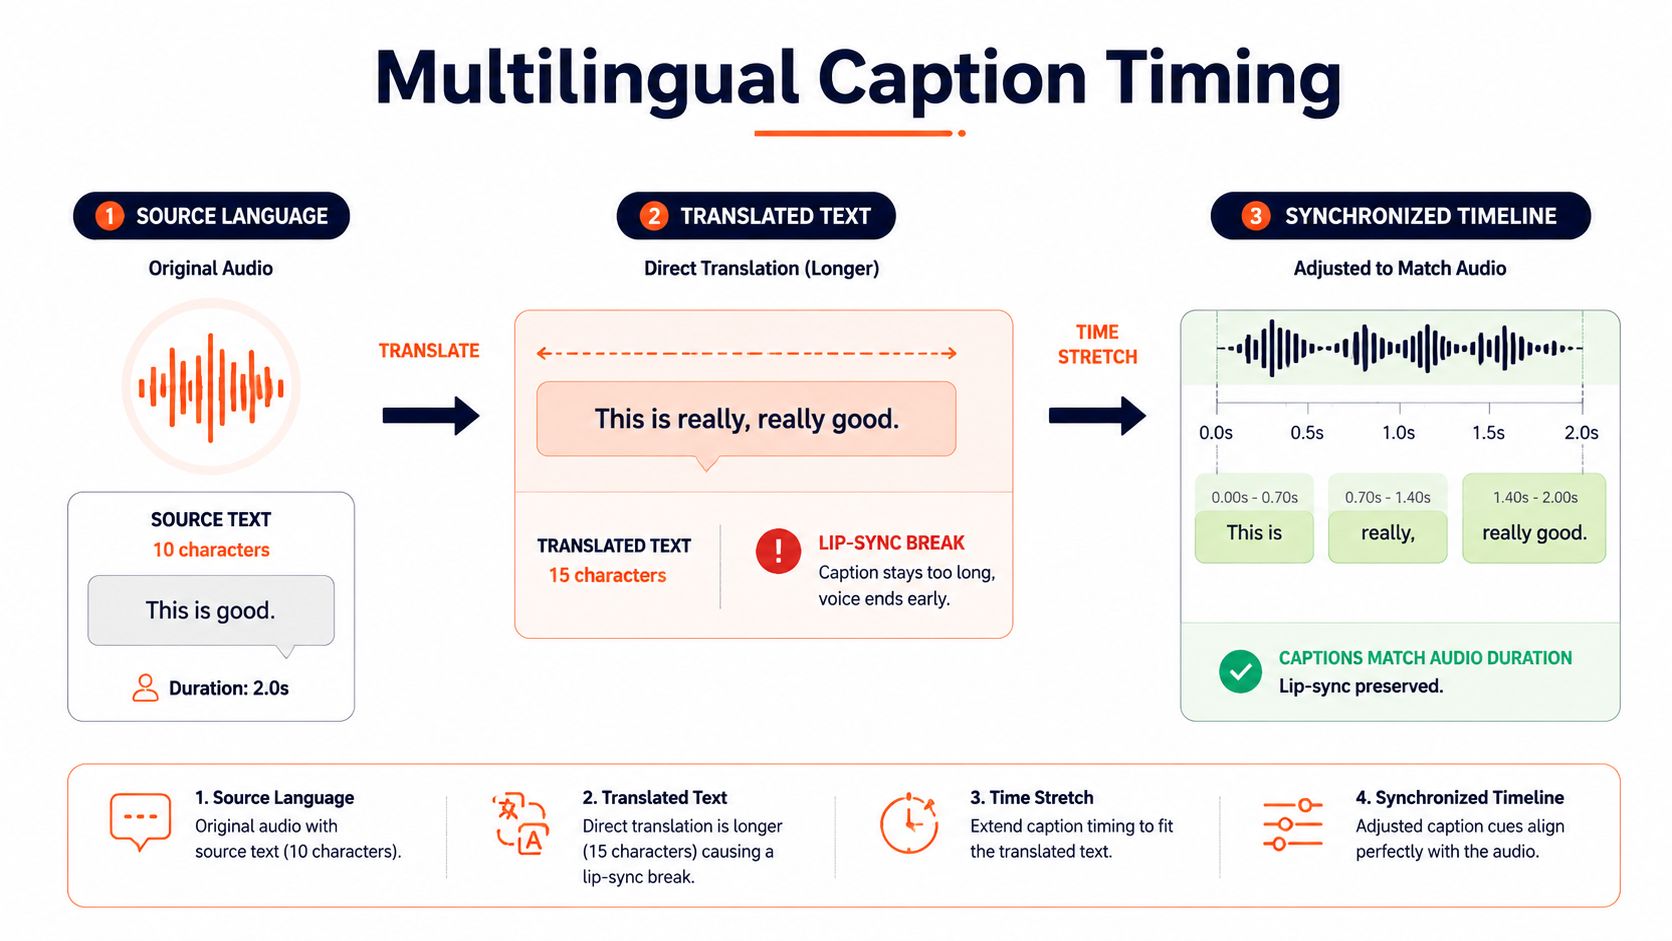
Multilingual captioning is a timing problem before it becomes a translation problem. A translated sentence may need different word order, punctuation, segmentation, and screen space from the source line. Translators must preserve meaning, but editors must also make the result readable inside the original cue boundaries.
Start with the original timing as the framework. Translate within each cue, then reflow the text so the line breaks follow the target language's grammar. If a phrase no longer fits comfortably, split the cue at a natural linguistic boundary rather than shrinking the font until it becomes difficult to read.
<a id="preserve-structure-across-languages"></a>
Preserve structure across languages
Build one reviewed master caption track, then create a separate SRT or VTT file for each language. Keep speaker labels, sound descriptions, and SDH cues in every version. A deaf viewer watching a localized version needs the same access to meaningful non-dialogue information as a viewer reading the source captions.
That includes cues such as music, laughter, applause, alarms, or off-screen sounds when they affect comprehension. Don't add those details only to the original-language file.
A translation memory or shared glossary helps keep recurring brand terms, acronyms, character names, and product features consistent across episodes. Translators should have access to the approved spelling and the surrounding context, not only an isolated caption line.
<a id="choose-the-right-delivery-architecture"></a>
Choose the right delivery architecture
For a social video, you may need a separate burned-in export for each language. For YouTube, Vimeo, or an LMS, selectable language tracks are more flexible. A primary burned-in language can coexist with a toggleable secondary track, but test the result carefully so the two caption systems don't overlap or compete visually.
Academic research on automatic captions continues to identify problems with segmentation, punctuation, spelling, recognition, and translation. Those issues become more visible after localization because a small source error can produce a misleading translated phrase. Guidance on corporate video captions translation is useful when the project needs language review beyond direct machine translation.
Export each language with consistent timecodes, validate the file encoding, and watch the localized video from start to finish. A translated track isn't finished when every sentence has been translated. It's finished when the words, timing, speaker cues, and screen layout work together.
<a id="pre-publish-checks-that-prevent-embarrassing-captions"></a>
Pre-Publish Checks That Prevent Embarrassing Captions
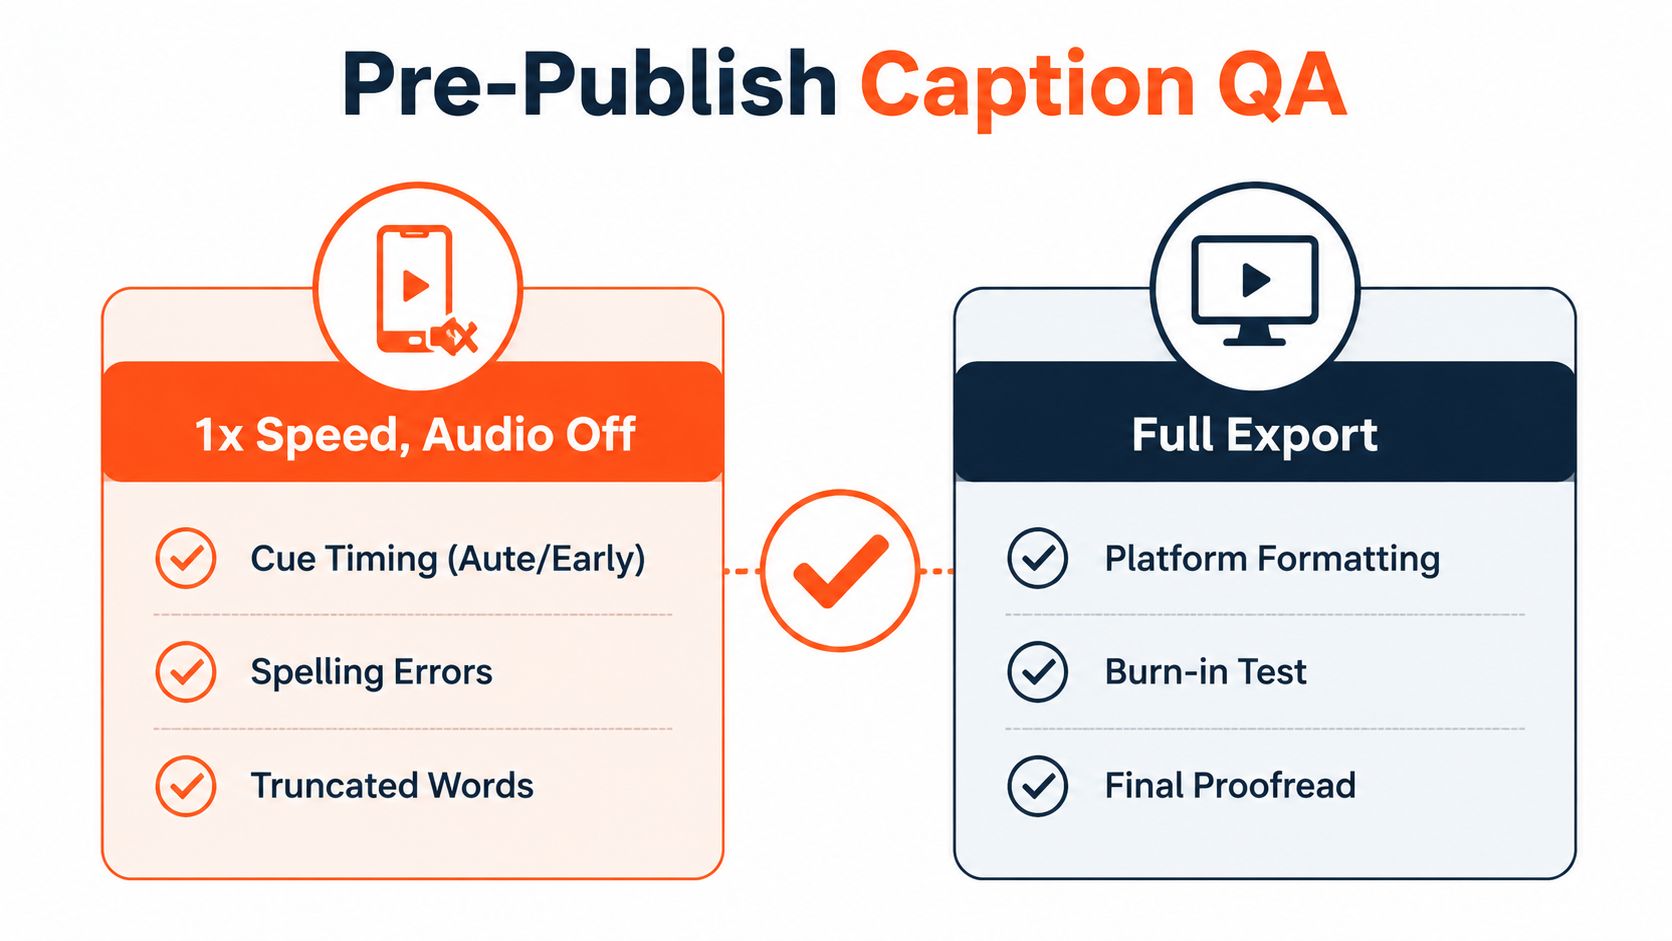
Approve captions only after checking the exported video, not just the editing timeline. Watch the finished file once on a phone with audio off at normal speed. Mark cues that arrive early, appear late, vanish too quickly, contain spelling errors, or split a phrase where the meaning becomes harder to follow.
<a id="run-the-silent-mobile-review"></a>
Run the silent mobile review
Audio-off playback exposes errors that sound-based editing can hide. Check whether the captions communicate the spoken point independently, whether words are truncated, and whether text stays readable across cuts, graphics, and lighting changes.
Review these points:
- Homophones: Check words such as their, there, and they're against the audio and surrounding meaning.
- Names and products: Search the transcript for phonetic spellings, inconsistent capitalization, and recurring terms that changed between captions.
- Numbers: Confirm that every written figure matches the spoken meaning and the source material.
- Cue timing: Watch the speaker's mouth and body language for early or delayed entries.
- Visual obstruction: Move captions away from faces, diagrams, charts, logos, and important interface elements.
<a id="verify-the-actual-delivery-file"></a>
Verify the actual delivery file
Open the exported MP4 and load the SRT or VTT into the destination player. Check for empty cues, awkward line breaks, duplicate timing, missing characters, and encoding problems. A clean timeline does not guarantee a clean delivery file.
The viewing environment determines the export. Short-form feeds generally need readable burn-ins inside the visual safe area. YouTube and web players commonly support selectable caption files, while an LMS may require a particular text format or a burned-in MP4. Decide where the video will be watched before finalizing caption styling.
Accessibility checks should cover contrast, mobile readability, and meaningful SDH cues when dialogue competes with sound. Quality control also needs to account for viewers who watch without audio, especially when a video is embedded in an article. This video production guide for blogs offers related guidance on making the video and its supporting text work together on the page.
For the final pass, watch the exact export on the device and platform intended for viewers. Confirm that burn-in placement, selectable tracks, and timing still work after upload or import.
Final check: Never approve the subtitle file until you've watched the exact export on the device and platform where the audience will encounter it.
ClipNova can generate synchronized subtitles from uploaded videos and export burned-in MP4, SRT, VTT, or ASS files. Use the workflow that matches the destination, then complete the accuracy review yourself.
Ready to ship your own?
Start creating viral videos with AI in under twenty minutes, no credit card required.